What is Low Voltage Landscape Lighting?
Low-voltage landscape lighting consumes only 12 volts and can be a popular option for residential outdoor light fixtures. It offers security and cost-efficiency and doesn’t require installing dangerous electric wires.
Benefits of Installing Low Voltage Landscape Lighting
Installing landscape lighting is far easier than you would think. You may not need to hire a licensed electrician to work with if you wish to DIY (do-it-yourself installation). Furthermore, you can change the design to your liking anytime.
Low-voltage outdoor lighting can work in any environment, even in a wet location near a garden or swimming pool. Moreover, it uses environmentally friendly, energy-efficient LED lights, and can last much longer than conventional light fixtures.
Nevertheless, illuminated paths, driveways, steps, trees, and statues can enhance the beauty of your home’s exterior as the sun goes down. If you are still unsure whether to use low-voltage lighting for your outdoor space, we have listed some of its benefits.
1. Provides Safety and Security
Adequately installed outdoor lights can illuminate paths, driveways, and landscapes, improving visibility for anyone walking the path at night. In addition, low-voltage lighting reduces the risk of an electric shock, and even if it occurs, it can be harmless.
A study also concludes that outdoor lighting could help reduce severe crimes such as home robberies and murder by 36%.
2. Improves the Appearance of Your House
A well-lit and perfectly styled outdoor lighting can work wonders by enhancing the outdoor appearance of your house, even if it is an old one.
Additionally, it could transform your bare outdoor space by giving it extra illumination and a stylish and sleek appearance. Nonetheless, the well-lit landscape would look pleasing to the eye.
3. LED Lights are Energy-efficient
LED in outdoor lighting offers the best performance, as they are low wattage and consume less energy. On the other hand, high-wattage lamps use a considerable power supply to produce energy lost in heat. In contrast, LED uses little power, up to 12v, to cast a bright light.
4. LED Low Voltage Lighting Comes in Various Color Temperature
Whether you like bright colors or are looking for a warm white and mellow glow in your light fixture, LED offers a wide range of color temperatures. You can match them to the rest of your outdoor lighting plan for an attractive appearance.
5. LED Light Fixtures are Cost-efficient
As we know, conventional outdoor lighting consumes more energy, which may pile up your electricity bill. Whereas outdoor LED lights don’t require a conduit, you won’t need to invest in a high-powered transformer for lighting installation.

Figuring Out What Landscape Lighting Supplies You Will Need
Before installing outdoor lighting, you would need to form a specific plan. Low-voltage LED lights are reasonably straightforward to install. However, knowing some tips beforehand is helpful to ensure a hassle-free light installation process. So, if you’re ready, let’s get going with the rest of the process.
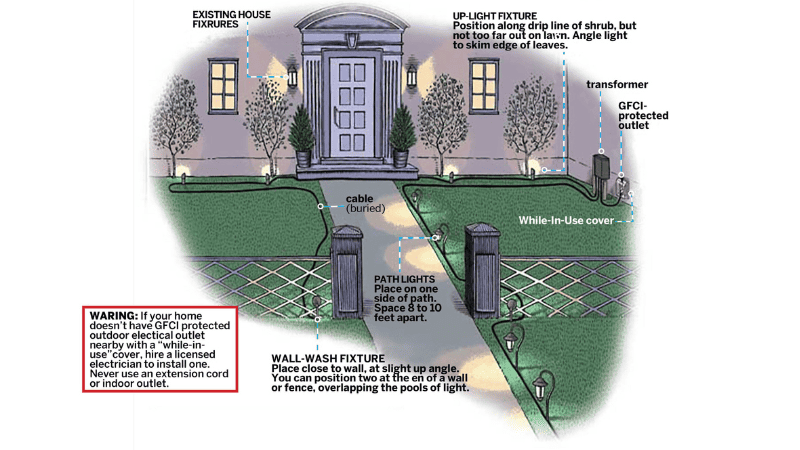
Step 1: Planning Your Low Voltage Outdoor Landscape Lighting Layout
Creating a low-voltage outdoor lighting plan will help you choose the correct supplies, such as wire, transformer, wire connectors, path lights, and more fixtures.
The first step in an outdoor lighting plan would be to figure out which areas need illumination and what kind of light fixtures would best blend in with the exterior of your house.
Planning the main wire layout will help you determine the best deployable wiring method. It will also assist you in avoiding any potential problems in the installation that might arise in the future.
Step 2: Make a Low Voltage Outdoor Landscape Lighting Diagram
It is advisable to draw a rough sketch for the wiring and light placement areas to determine if the light fixtures would come into contact with garden trimmers or mowers.
Check the location, take actual measurements, and add them to your diagram. Out of many wiring methods, the sketch will help you determine which to choose and how much wire would be required. Take measurements as accurately as possible because you need them to estimate the distance between the wire runs.
If your house has ample outdoor space, use a separate paper for each region that needs lighting. You can use a simple blank paper or graph paper to sketch the outdoor lighting diagram.
Step 3: Choosing Low Voltage Landscape Lighting
When purchasing light fixtures for your low-voltage outdoor lighting plan, you must choose all the high-quality fixtures that look attractive, durable, and cost-efficient.
- Landscape Spotlights
Spotlights are ideal for highlighting architectural features, unique plants, or trees.
Path lights are used to illuminate pathways and walkways, to improve visibility. They can also be used in flower beds to enhance the beauty of flowers and areas of vegetation at night.
- In-ground/Well Lights
In-ground or well-lights usually come round installed directly into the ground to up-light the pathways or ground while keeping the light source hidden.
- Up/Downlights
Up/downlights are also spotlights and floodlights designed to cast light from an upward or downward position. They are usually installed on an exterior wall of a house.
- Flood Lights
Floodlights have wider beams to provide broader coverage for walls and facades from a single fixture.
- Step Lights
Step lights are a low-voltage lighting solution used to illuminate ground stairs.
- Hardscape Lights
Hardscape light fixtures illuminate specific architectural features by casting low-profile lighting that adds dimension to an otherwise tight space.
- Underwater Lights
Underwater lights are typically used in fountains and ponds and are specifically designed to be fully or partially immersed in water.
- String Lights
String lights are multi-colored electric lights placed evenly on a cable wire and used for decorating trees, shrubs, and posts.
Step 4: Select the Transformer
A transformer is the main device that converts a line voltage of 120 volts into 12 volts for lighting fixtures. Calculate the total wattage of the system. According to the lighting diagram, this includes power for all the light fixtures and devices.
Now multiply the total wattage with a safety factor of 1.25, and you’ll get the recommended wattage of the transformer.
For example:
If you have 10 light fixtures of 20 watts. Your total requirement would be 10*20=200 Watts. And the recommended power of the transformer will come out to be 200*1.25= 250W
You can use an even higher-rated (power) transformer to ensure all the lighting fixtures have enough power. A higher-rated transformer also produces less heat, which can indirectly prolong the life of electrical components. However, don’t go higher than 33 % of the recommended power.
Ideally, you could install it near or inside the house, preferably in a garage or basement. Depending on your lighting plan, you may require the use of one or more transformers.
Step 5: Choosing Low Voltage Wire
The next step in installing low-voltage outdoor lighting is choosing wires that will connect the transformer to each fixture, as they come in different numerical gauges and lengths.
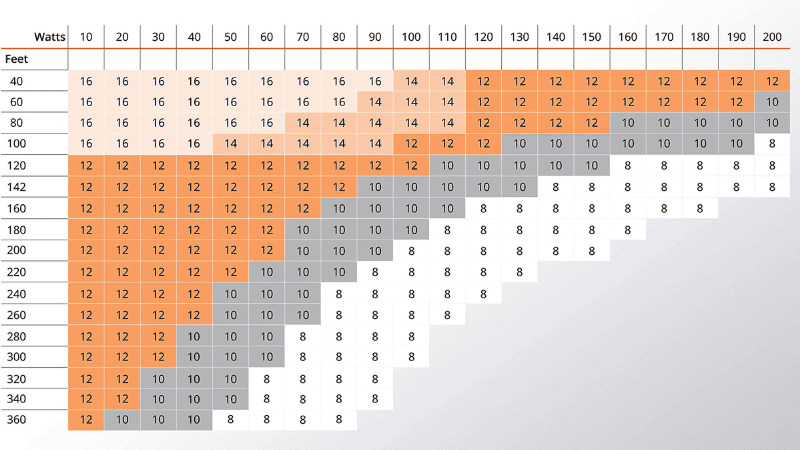
You can choose 10-, 12-, 14-, or 16-gauge wires that are more commonly used for low-voltage outdoor lighting.
A thicker wire would be needed for higher-power outdoor lighting installation as they carry the current to longer distances. A thinner wire would be better for low-power projects below 200 watts.
We recommend selecting a 10- or 12-gauge wire for long distances to prevent voltage drop. A copper wire would be best suited for low-voltage outdoor lighting as it offers less resistance.
Consider this table.
Step 6: Choosing Wire Connectors
You can follow the next step if you’ve chosen the perfect low-voltage transformer, cable length, gauge, and type for your low-voltage outdoor lighting project. Select a wiring method for connecting the fixtures to the transformer that best suits your lighting requirements.
- Daisy chain method
As the name suggests, the daisy chain method connects all fixtures in a string of daisies, with the first connecting to the transformer. This wiring method is best suited when the fixtures are not placed in scattered groups, but the voltage will drop with distance.
The first fixture may have a voltage of 12 volts, whereas the last fixture may be running on 7 volts. However, this method would be fine for outdoor lighting as LEDs have a low acceptable voltage range.
- T-method
The t-method is similar to the daisy chain method except for the transformer that connects to the middle of the fixture chain instead of the first fixture. This wiring method saves on the amount of wire used in the outdoor lighting project.
However, use it only if you’ve already built a daisy chain but now want to save the amount of wire.
- Hub method
This wiring method connects all wire runs to a hub junction, and from there onwards, a single mainline connects to all fixtures. Moreover, it ensures equal voltage for all fixtures and reduces the number of splices in the field.
The Hub method is suitable for deployment when the fixtures are in a group form and placed in a small area. However, it requires a lot more wire than other methods.
Installing Low Voltage Landscape Lighting
If you’ve learned the basics of low-voltage landscape lighting and created the layout plan, now is the time to install your lighting project. Start by gathering the required tools and then proceed.
1. Mark the location
You can decide which zones to light up for small properties and mark them before digging. If you have a large property, getting professional help from utility companies would be wise. They will mark the location of underground wires and pipes before you start digging to install outdoor lighting.
2. Mounting the Lighting System
Assemble your 12-volt LED lights. Now install them in ready fixtures and attach mounts. You can mount fixtures in three ways:
- Attach a stake to the fixture and mount it directly into the ground.
- Use a power drill to attach the fixture to a hard surface.
- Use a shovel, spade, or a post digger to mount the fixture directly into the ground.
3. Laying the Underground Electrical Wires
Clear the path for your wires and place all the fixtures according to the sketched outdoor lighting layout. Your first fixture should be placed on a wire run at least 10 feet from your transformer to prevent it from overheating.
Choose a wiring method from the methods mentioned above that works best to reduce the voltage drop issue and save on the wire amount. We recommend using the T-method.
If you have many fixtures and your lighting system is extensive, we suggest forming multiple wire runs of 100-150 watts each. Add light fixtures on the wire run at roughly the same distance from the transformer so they’ll experience equal voltage drop.

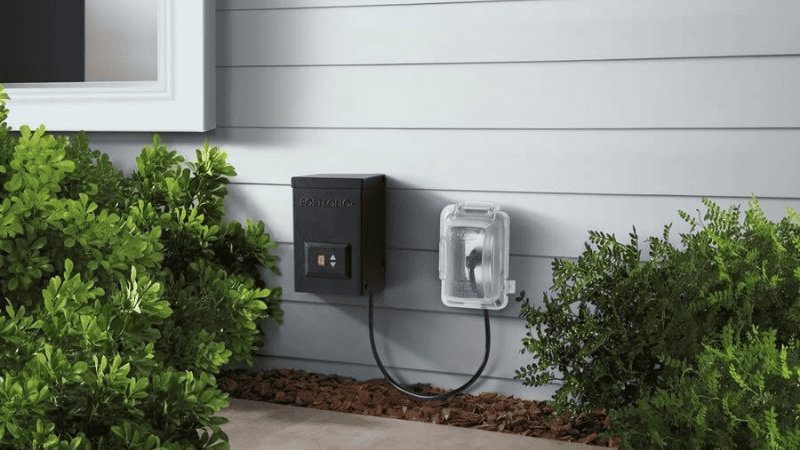
4. Placing the Transformer
Now, mount your transformer for low-voltage lighting. The transformer should be placed one foot away from everything and on a surface that can withstand heat. Furthermore, if there is a water feature nearby, the transformer must be 30 feet away.
Dig trenches and lay out your wire runs. You can use a shovel or spade to dig at least 6 inches deep trenches.
Place your underground wires in the ditch and cover them with dirt. But leave at least 5 feet of wire uncovered from the ends so you can adjust later.
5. Connecting Wires
Begin connecting your wire runs to the transformer. Use a clamp to connect the transformer. Place wire runs according to their gauge in the transformer’s volt taps. Protect the exiting wire from the transformer with a conduit.
6. Connecting the Light Fixtures
Splice lead wires of fixtures. Use twist-on style wire connectors. Strip the end of the wires at least half-inch, twist them clockwise, and insert the connector in the cap. You can also use clamp connect junctions to protect the wire connectors from moisture and corrosion.

7. Test Run
Once you’ve connected all wires, test your outdoor lighting system by turning on the transformer. Then, walk around your property to see if all fixtures are lit.
If all your fixtures are working properly, you can look for adjustments in your outdoor lighting installation.
At nighttime, check the lighting effects created by the fixtures and ensure that each fixture casts light at your desired area in the landscape. Adjust the angle of the fixtures if they are glaring. Finish your outdoor lighting project by programming the timer on the transformer.
FQAs
How Far Can You Run Low Voltage Landscape Lighting Wire?
You can use 12-gauge wire runs for around 100 feet without facing a voltage drop issue. However, the total wattage of the light fixtures must be less than 100 Watts or equal.
How Many Lights Can You Put on a Low-voltage Transformer?
It depends on the total wattage of the LED light fixture. If a transformer is 200 Watts, you can place 200 LEDs of 1 watts each or 4 LEDs of 50 watts each. However, the total wattage should not exceed 90% of the transformer’s capacity as there will be some power loss in the transmission wire.
Can I Mix Halogen and LED Landscape Lights?
We don’t recommend mixing them as both use completely different wattages. The voltage ratio also needs to be adjusted before combining them, as it may cause long-term damage to your landscape lighting system.
However, a professional electrician would know how to work with the voltage ratio and wattage to adjust them according to the system, so they may not cause any damage.
Conclusion
Outdoor landscape lighting can significantly improve your home’s security, increase curb appeal, and add extra value. If you are considering installing outdoor low-voltage landscape lighting, it is important to plan the system correctly. This will ensure you get the most out of your investment and avoid any problems.
RC Lighting Is Your One-Stop Shop for Premium Low Voltage Outdoor Landscape Light
RC Lighting is a leading manufacturer of high-quality LED lighting solutions. We are committed to bringing you the best lighting fixtures quickly and within budget.
Our extensive catalog of Indoor & Outdoor lighting solutions can be tailor-made to suit your lighting needs. Get the help of our expert designers and engineers to realize your ideal lighting setup.
You can rest assured knowing that you are getting CE & RoHS-certified products that comply with international safety standards. We also offer a standard 5-year warranty on our products.
Take advantage of our 24/7 customer service and Get a Quick Quote!