
Planning recessed kitchen lighting sounds simple—until the shadows show up over your countertops. And once the holes are cut, fixing a bad layout means patching drywall and starting over.
The good news? A few simple rules prevent most of these mistakes. After years of supplying kitchen downlights to installers, we’ve seen which layout errors repeat most often—and how easy they are to avoid.
In this guide, we’ll cover mapping your zones, spacing your fixtures, and choosing the right LED housings. Let’s start with a plan.
Start With Your Kitchen’s Zones and Ceiling Height
Before you pick a single fixture, you need a clear picture of the room. A good layout starts with measurements and a map of where you actually work.
Skip this step, and you’ll space lights evenly across the ceiling while leaving your busiest counters in the dark.
Measure Room Length, Width, and Ceiling Height
Grab a tape measure. Record the room’s length, width, and ceiling height. These three numbers drive every decision that follows.
Ceiling height matters most. It sets how far apart your fixtures should sit. It also controls how wide each light spreads across the counter below.
Standard 8-foot ceilings need fixtures closer together. Taller ceilings—9 or 10 feet—let you space them wider without leaving dark gaps.
Mark Major Work Zones (Island, Sink, Cooktop, Prep)
Sketch a quick overhead diagram. Mark your key work areas: the island, sink, cooktop, and main prep counter. These are the spots that need bright, shadow-free task light.
Think of your layout in two layers. General lighting covers the whole room. Task lighting targets these specific work zones.
Marking them early ensures a fixture lands where you need light—not just where the grid happens to fall.
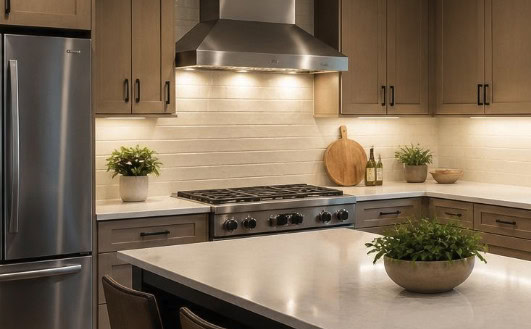
Note Obstructions and Glare-Sensitive Areas
Finally, note anything that could get in the way. Ceiling joists, HVAC ducts, and plumbing runs all limit where you can cut.
Also flag glare-sensitive spots. A breakfast nook or a seat facing the ceiling counts here. A light placed in someone’s line of sight creates uncomfortable glare at the table.
Catching these obstacles on paper is far cheaper than finding them mid-install.
Use a Simple Spacing Formula to Avoid Dark Spots
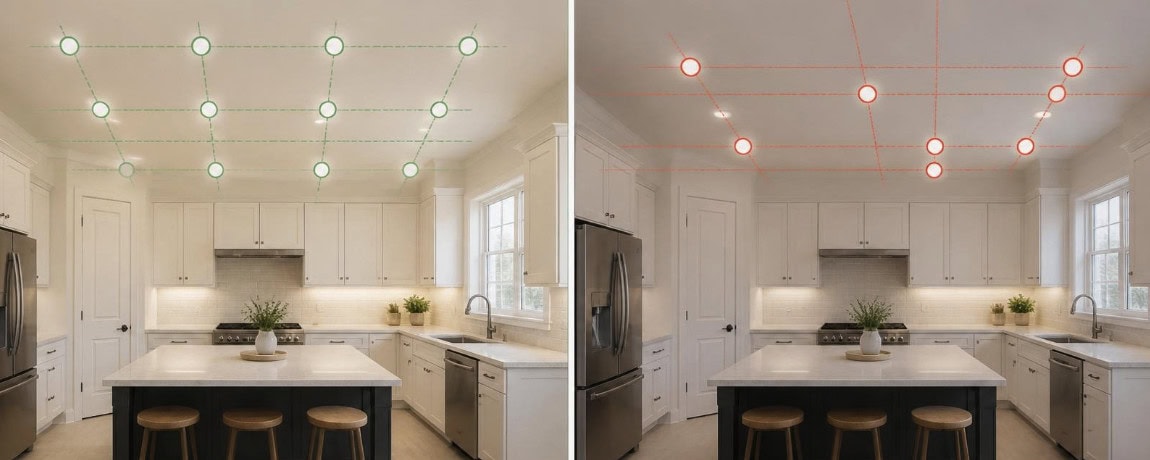
Once your zones are mapped, spacing is where most layouts succeed or fail. Space lights too far apart, and you get dark patches. Cram them too close, and the ceiling looks busy and overlit.
A simple formula solves both problems. It gives you even, balanced coverage across the whole room.
The Ceiling Height ÷ 2 Rule
Here’s the rule installers rely on: divide your ceiling height by two. That number is your maximum spacing between fixtures.
An 8-foot ceiling means fixtures roughly 4 feet apart. A 10-foot ceiling allows about 5 feet.
This spacing keeps the light pools overlapping just enough. You get smooth, even coverage—no bright rings, no dark gaps.
Keep Fixtures the Right Distance From Walls
Don’t push your outer fixtures tight against the walls. That creates hot spots on the wall and leaves the room center underlit.
A good rule: place the first row 18 to 24 inches from the wall. Then space the rest evenly between them.
This keeps light on your counters and cabinets, where you actually need it—not wasted on the ceiling edges.
Adjust Spacing for Beam Angle and Output
The formula is your starting point, not a hard limit. Beam angle and lumen output fine-tune the result.
A narrow beam throws a tight, focused pool. A wide beam spreads softer light over a larger area. Wider beams can sit slightly farther apart.
Always check the fixture’s specs before you finalize the grid. Two lights with the same wattage can light a room very differently depending on beam spread.
Position Fixtures Over Key Work Zones
General spacing lights the room. But your work zones need targeted attention. This is where task lighting comes in—and where the biggest comfort difference is made.
Light the Counters, Not Just the Floor
The single most common complaint we hear is shadows falling on the countertop. The cause is almost always the same: the fixture sits directly over the person working, so their own body blocks the light.
The fix is placement, not more lights. Shift each fixture 6 to 10 inches (15–25 cm) toward the counter’s outer edge, away from the wall. That small move puts the light in front of the person instead of behind them.
Before cutting any holes, run a quick standing test. Have someone stand at the counter as they normally would, then check where the light would fall. This 30-second check prevents shadow problems—and the drywall patching that comes with fixing them later.
Space Island Lights Evenly and Symmetrically
Islands are focal points, so symmetry matters. Uneven island lights are the first thing the eye catches.
For most islands, two to three recessed lights work well. Space them evenly along the island’s length. Center them over the island’s width—not the room’s.
Measure from the island edges, not the walls. This keeps the lights looking intentional and balanced.
Handle Sinks and Cooktops Carefully
Sinks and cooktops usually sit against a wall or under cabinets. Center a fixture over the sink so you can see into the basin without shadow.
For cooktops, check your range hood first. Many hoods include built-in task lights. If so, you may not need a dedicated recessed fixture there—just keep the surrounding area well lit.
Cabinets, Shelves, and Accent Lighting
Tall cabinets, open shelves, and display niches often need their own treatment. A ceiling downlight tends to light the cabinet fronts and leave the shelf interiors dark.
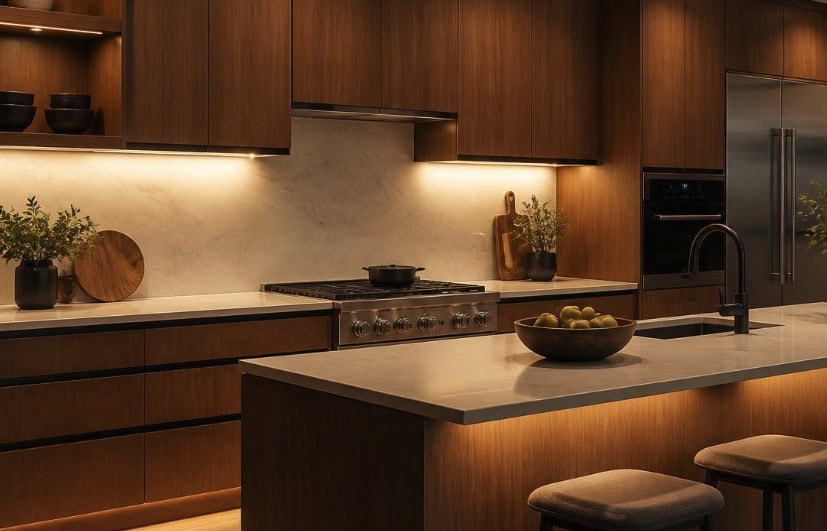
For open shelving or glass-front cabinets, aim a fixture slightly toward the shelf face—or pair it with under-cabinet strip lighting. That combination lights both the counter and the items on display.
Accent areas work the same way. If you want to highlight a backsplash, a piece of art, or a feature wall, use an adjustable (gimbal) recessed fixture. Tilt it toward the surface instead of pointing straight down. A fixed downlight can’t do this—so choose your housing type before the layout is final.
The goal is layers. General light fills the room, task light covers the counters, and accent light adds depth and highlights the features you want people to notice.
Position Fixtures Over Dining, Seating, and Dimming Zones
Many kitchens flow into a dining nook or open-plan seating area. These zones aren’t work areas—they’re for eating, talking, and relaxing—so they need a different lighting approach.
Here the goal shifts from bright task light to comfort and control.
Avoid Glare Above Seating and TV Areas
The most common mistake in seating zones is placing a downlight directly above where people sit or look. That puts glare straight into their eyes—or reflects harshly off a TV screen.
Pull fixtures slightly off-center from seats and screens. Position them to wash the surrounding area rather than beam straight down onto a face or display.
For dining tables, avoid lighting the tabletop alone with harsh downlights. A softer, wider wash—or a pendant paired with dimmed recessed lights around it—feels far more inviting than a spotlight on the plates.
The test is simple: sit where guests will sit, then look up. If you can see the bright source directly, shift the fixture.
Plan Dimmable Zones and Driver Compatibility
Dining and seating areas rarely need full brightness. Dimming is what makes these zones feel comfortable.
Group these fixtures on their own dimmable circuit, separate from the task zones. That lets you keep the counters bright while softening the dining area for a meal.
Dimming only works cleanly when the driver and dimmer match. Mismatched pairs cause flicker, buzzing, or a narrow dimming range. Confirm the fixture’s driver type against a compatible dimmer before wiring—we cover this pairing again in the mistakes section, because it’s the one that causes the most callbacks.
Choosing the Right Fixtures and LED Lights
A good layout still needs the right fixtures. Kitchens deal with heat, moisture, and long daily use—so not every downlight is a fit.
Get these four specs right, and the rest of the install gets easier.
Pick the Right Size and Fit
Downlight size affects both coverage and look. For most kitchens, 4-inch and 6-inch fixtures cover the majority of layouts.
Use 4-inch lights for accent zones, task areas, and smaller kitchens. Use 6-inch lights for general ceiling coverage in larger rooms.
Mixing sizes is fine—just keep each zone consistent. All-6-inch general lights with 4-inch accents looks intentional. Random sizes look like an afterthought.
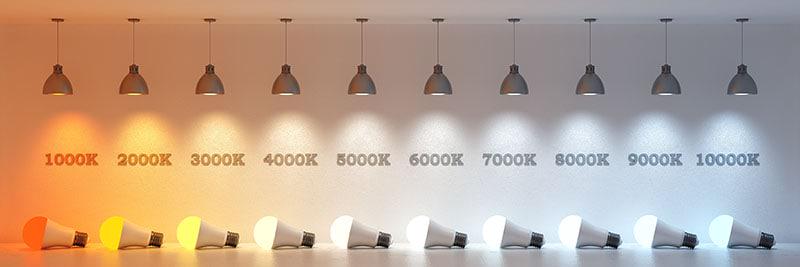
Choose a Color Temperature Around 3000K–4000K
Color temperature sets the mood and how food looks. It’s measured in Kelvin (K).
- 3000K — warm, cozy, good for open-plan kitchens that flow into living space
- 3500K–4000K — neutral, clean, ideal for prep and cooking where you need to see clearly
Whatever you choose, keep it the same across the whole kitchen. Mixed color temperatures make the ceiling look patchy—one of the easiest mistakes to avoid and hardest to fix later.
Also check the CRI (Color Rendering Index). Aim for CRI 80 or higher so food, produce, and finishes look true to color.
Use IC-Rated Fixtures Where Insulation Is Present
This one is a safety issue, not a preference. If your fixtures sit near ceiling insulation, they must be IC-rated (Insulation Contact rated).
Non-IC fixtures can overheat when insulation touches them, creating a fire risk. Always confirm the rating before installing in an insulated ceiling.
For any wiring or rating question, follow the National Electrical Code (NEC) and local code—or have a licensed electrician confirm.
Confirm Dimming Compatibility
Most kitchens benefit from dimming. Bright for cooking, soft for dining.
But not every LED works with every dimmer. Match your dimmer switch to the fixture’s driver type, or you’ll get flicker, buzzing, or a limited dimming range.
Check the fixture’s spec sheet for compatible dimmers before you buy. When you order in volume, request the compatibility list up front—confirming this at the sourcing stage prevents mismatched shipments and field callbacks later.
Common Recessed Lighting Mistakes to Avoid
Even a well-planned layout can go wrong at install. These three mistakes come up most often—and all are easy to prevent before you cut a single hole.
Spacing Fixtures Too Close (Hotspots)
More lights don’t mean better lighting. Placing fixtures too close together creates bright rings and hotspots on the ceiling, then an uneven, over-lit feel.
Stick to the ceiling height ÷ 2 rule instead of adding fixtures to be “safe.” Even, overlapping coverage beats a crowded grid every time.
Using Non-IC Housings in Insulated Ceilings
This is the most serious mistake, because it’s a fire risk—not just an aesthetic one.
Standard (non-IC) housings can overheat when ceiling insulation touches them. Any fixture near insulation must be IC-rated. Confirm the rating before install, and follow local electrical code or a licensed electrician.
Pairing Incompatible Dimmers With LED Drivers
Flicker and buzzing almost always trace back to a mismatched dimmer and LED driver—not a faulty light.
Match the dimmer to the fixture’s driver type before you buy. Check the spec sheet’s compatibility list, and when ordering in volume, request that list up front to avoid mixed shipments and field returns.
Frequently Asked Questions
How many recessed lights do I need in a kitchen?
Start with the ceiling height ÷ 2 spacing rule to set the grid, then add fixtures over each work zone. A typical 10×12 ft kitchen uses around 6 to 8 recessed lights, but counters, islands, and sinks may need extra task fixtures.
Are recessed lights alone enough for a kitchen?
Usually not on their own. Recessed lights handle general and task light well, but the best kitchens use layers—downlights for coverage, under-cabinet lighting for prep, and accent or pendant light for depth. Relying on ceiling downlights alone tends to leave shadows on counters and shelves.
Should kitchen recessed lights be on one switch or several?
Separate them. Group task zones (counters, island, sink) on one circuit and dining or seating zones on a dimmable circuit of their own. This lets you keep work areas bright while softening the eating and relaxing areas.
Getting Your Kitchen Lighting Layout Right
Planning a kitchen lighting layout involves more moving parts than it first looks—zoning, spacing, fixture size, color temperature, IC rating, and dimmer matching all have to line up before anything gets installed.
Ready to Light Your Kitchen the Right Way?
As an LED lighting manufacturer with years of experience supplying recessed downlights, gimbals, and under-cabinet lighting to contractors and distributors worldwide, we help clients match the right light fixture size, beam angle, color temperature, and dimming to every zone—before a single order ships.
If you’re planning a project or sourcing fixtures at volume, our team can help you match downlight size, beam angle, color temperature, and dimming to each zone before you commit.
Request a spec sheet or a quote and we’ll help you build a layout that lights the kitchen right the first time.