What is a Bollard Light?
LED Bollard Lights are vertical luminaires (lighting fixtures) for pathway and landscape illumination. Bollard lights are similar to post lights. But where post lights can be mounted anywhere, bollard lights are limited to ground mounting.
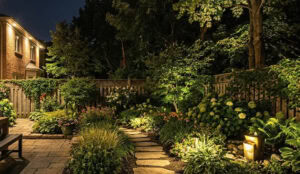
You can think of bollard lights as post lights with a specific function. Bollard lights are used for outdoor lightings, such as pathway lighting, road lighting, or park/garden lighting.

How to Set up Bollard Lights?
Setting up bollard lights is a simple process requiring much prep work. Your first step should be selecting the bollard light best for your application. Start with mounting height. Think about the aesthetics of your pathway. Does it need short or tall bollard light posts?
Next is selecting your light spacing, i.e., the distance between each luminaire (lighting fixture). Shorter light spacing means a more significant number of luminaires are required. Once you have determined the placement and size of your bollards, you can now focus on the right lighting direction.
Finally, you can focus on customizing your bollard lights. This includes selecting the actual design of your bollards. Keep in mind that some designs are limited to specific heights. You can also decide on your preferred color temperature and brightness at this point.
Let’s discuss each of the steps mentioned above in detail.
Mounting Height
Mounting height should be your first step in lighting up a path with bollard lights. Tall lights are better suited for wide pathways since they provide a larger coverage area. But Tall lamps are the most customizable. Design and beam angle variations are easier to implement in a larger light fixture.
The size of your bollard light can affect your light spacing and luminance. Larger sizes are also more expensive and can easily send you over budget.
Bollard lights can be generally categorized into three sizes, small, medium, and tall.
Short Bollard Lights
Bollard lights can be as small as 8 inches., around the height of your shin. Smaller bollards are brighter but have a shorter light spread. You will have to space your bollards closer to maintain a reasonable illumination level.
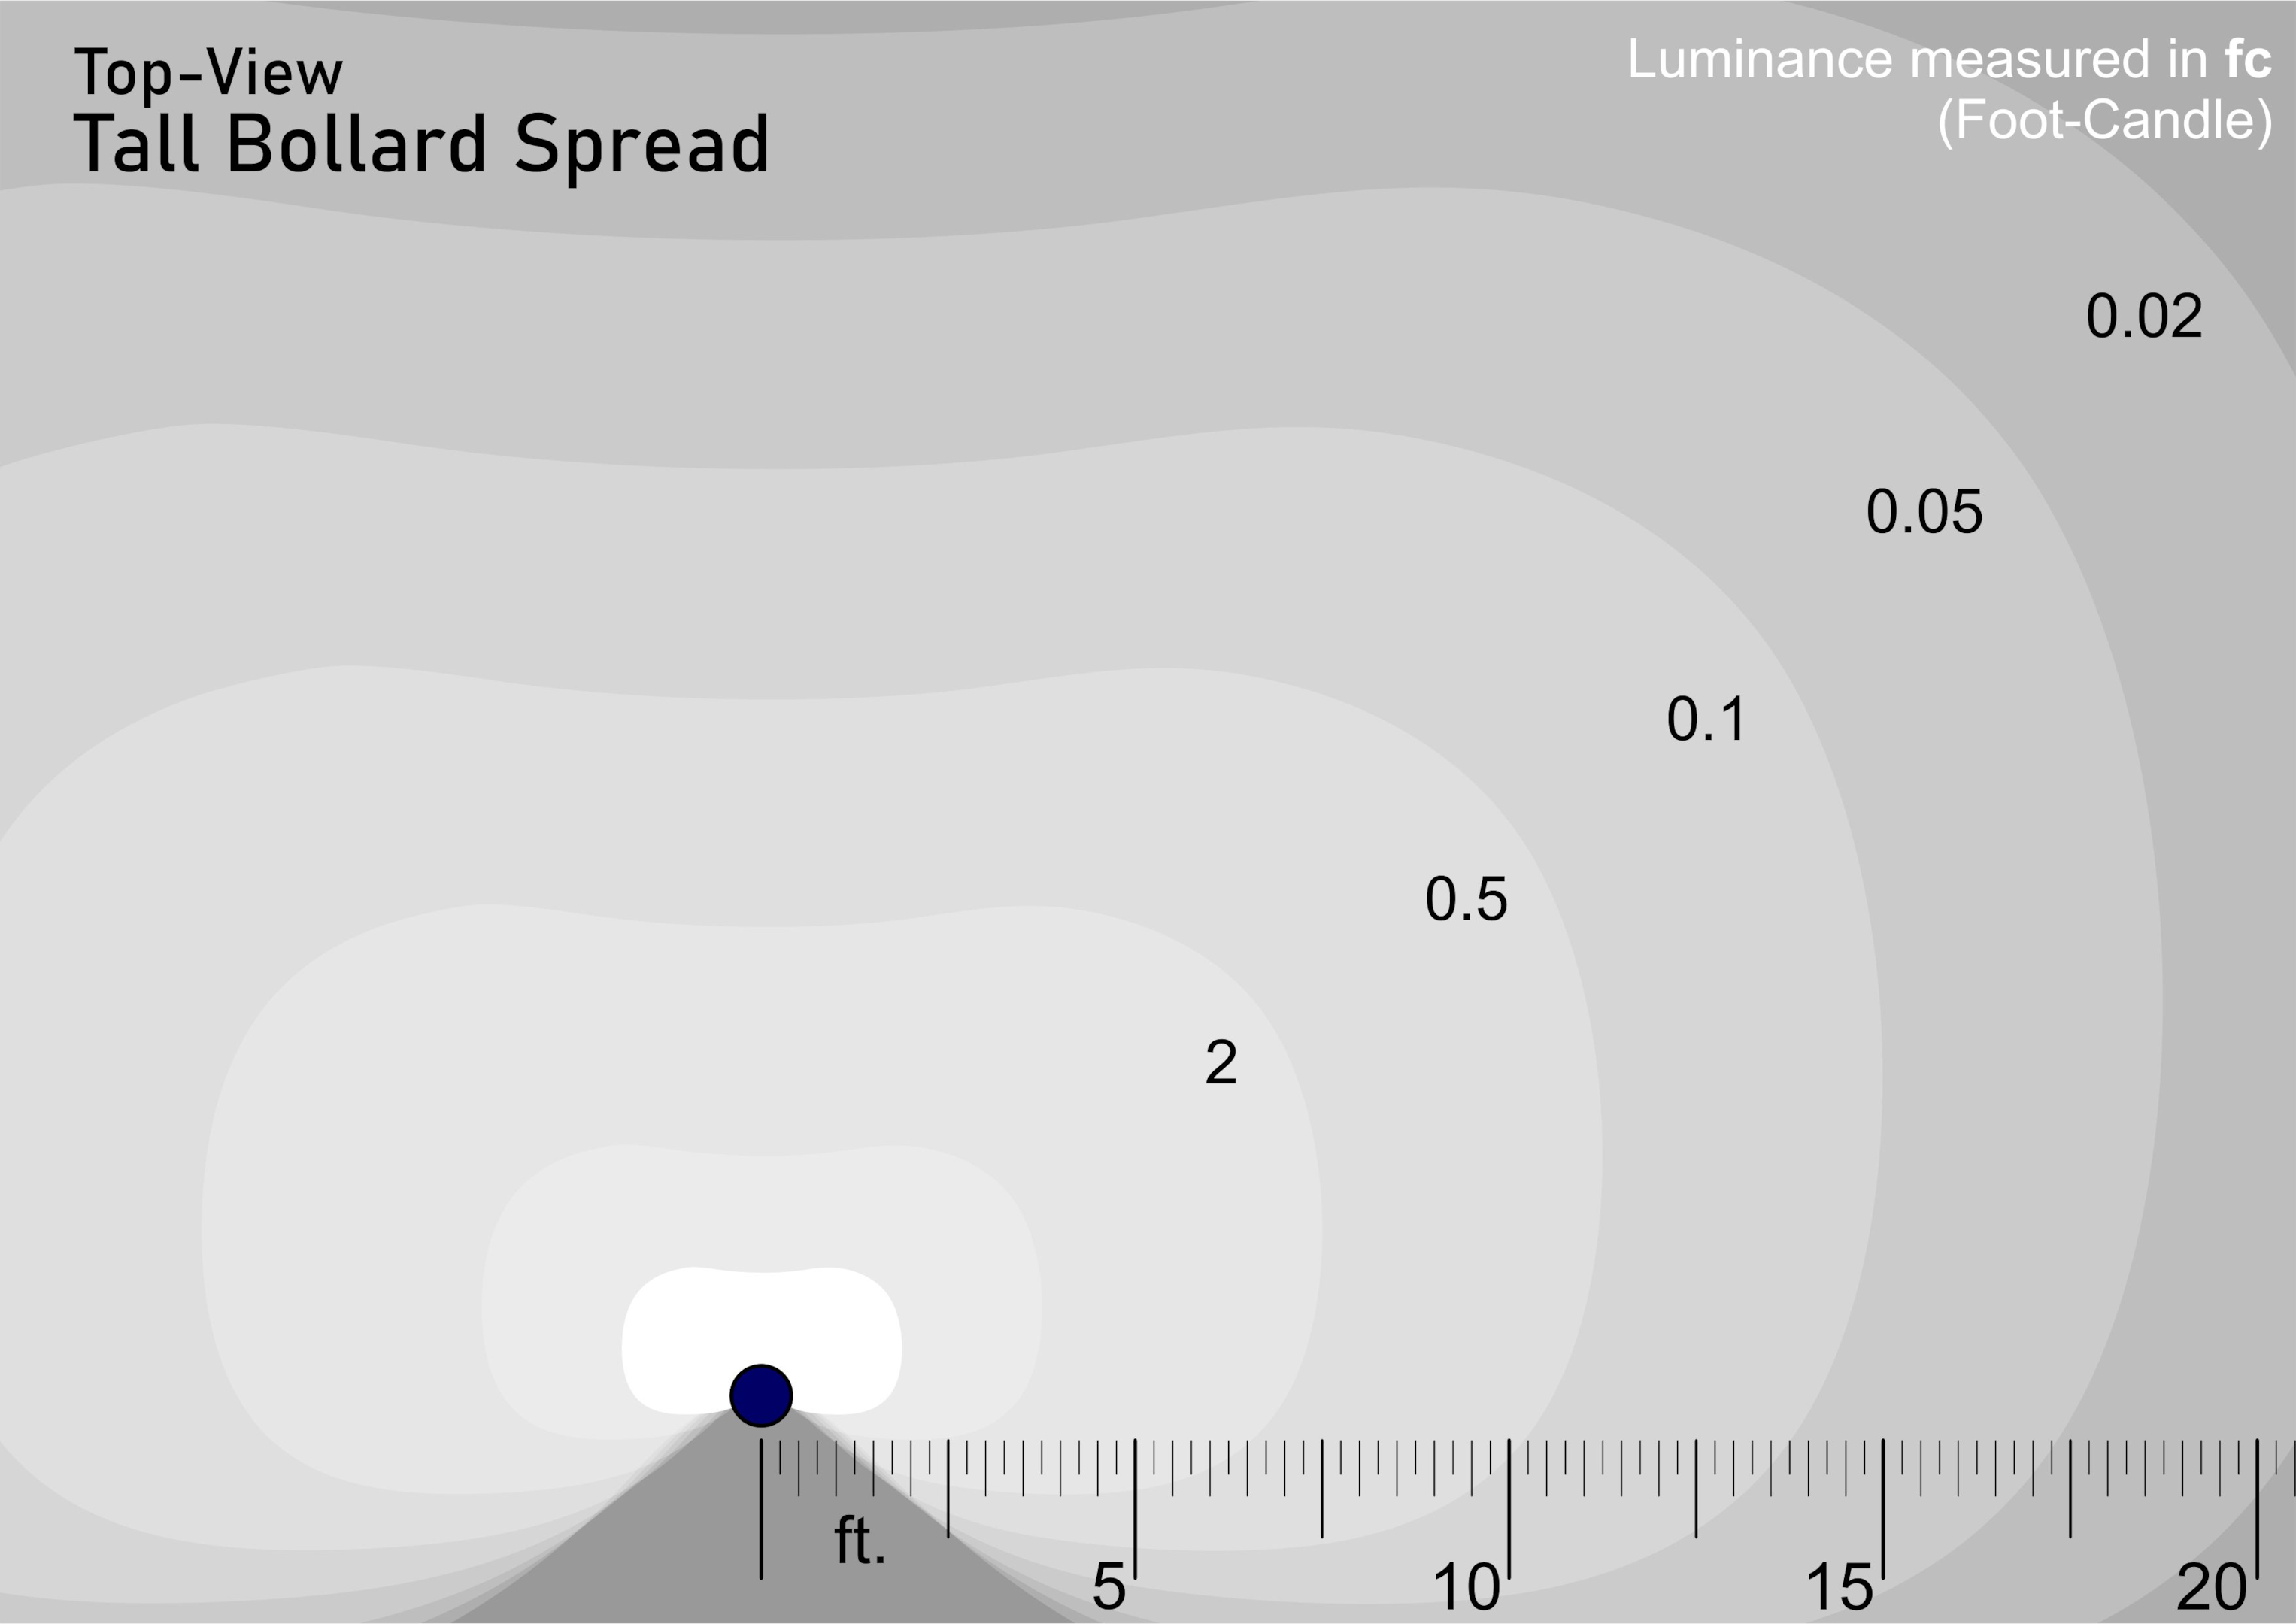
Tall Bollard Lights
Most bollard lights are around 3ft. tall, around your waist. Tall lamps will have a wide beam spread, and their size naturally results in the maximum coverage area. One drawback of tall lights is their weak luminance. This can be compensated by using brighter LEDs in your bollard lights or reducing the light spacing.
Medium Bollard Lights
Medium bollard lights are somewhere between short and tall sizes. Their height is around 1.5ft, close to your knee height. They have short and tall bollard qualities, maintaining decent brightness and light spread.
Light Spacing
Light spacing is distance optimization from one bollard to the next to ensure even lighting across a pathway. LED bollard lights are brightest at the center and start fading towards the sides. If your bollard lights are too far apart, they will leave a small dark space in the pathway between the lights, which can be a safety hazard.
For bollard lighting, mounting height is the most critical factor. Traditional lighting fixtures are installed indoors at 10 ft. or more. While bollard or landscape lighting is installed outdoors and typically under 3 ft. The minimum luminance for outdoor parking areas is 0.25 foot-candle (fc) or 2.7 lux. Higher lux values result in more light. So use that as a general reference for your garden, driveway, or pathway bollard lighting.
Here is a simple luminance distribution chart for led bollard lights based on height.

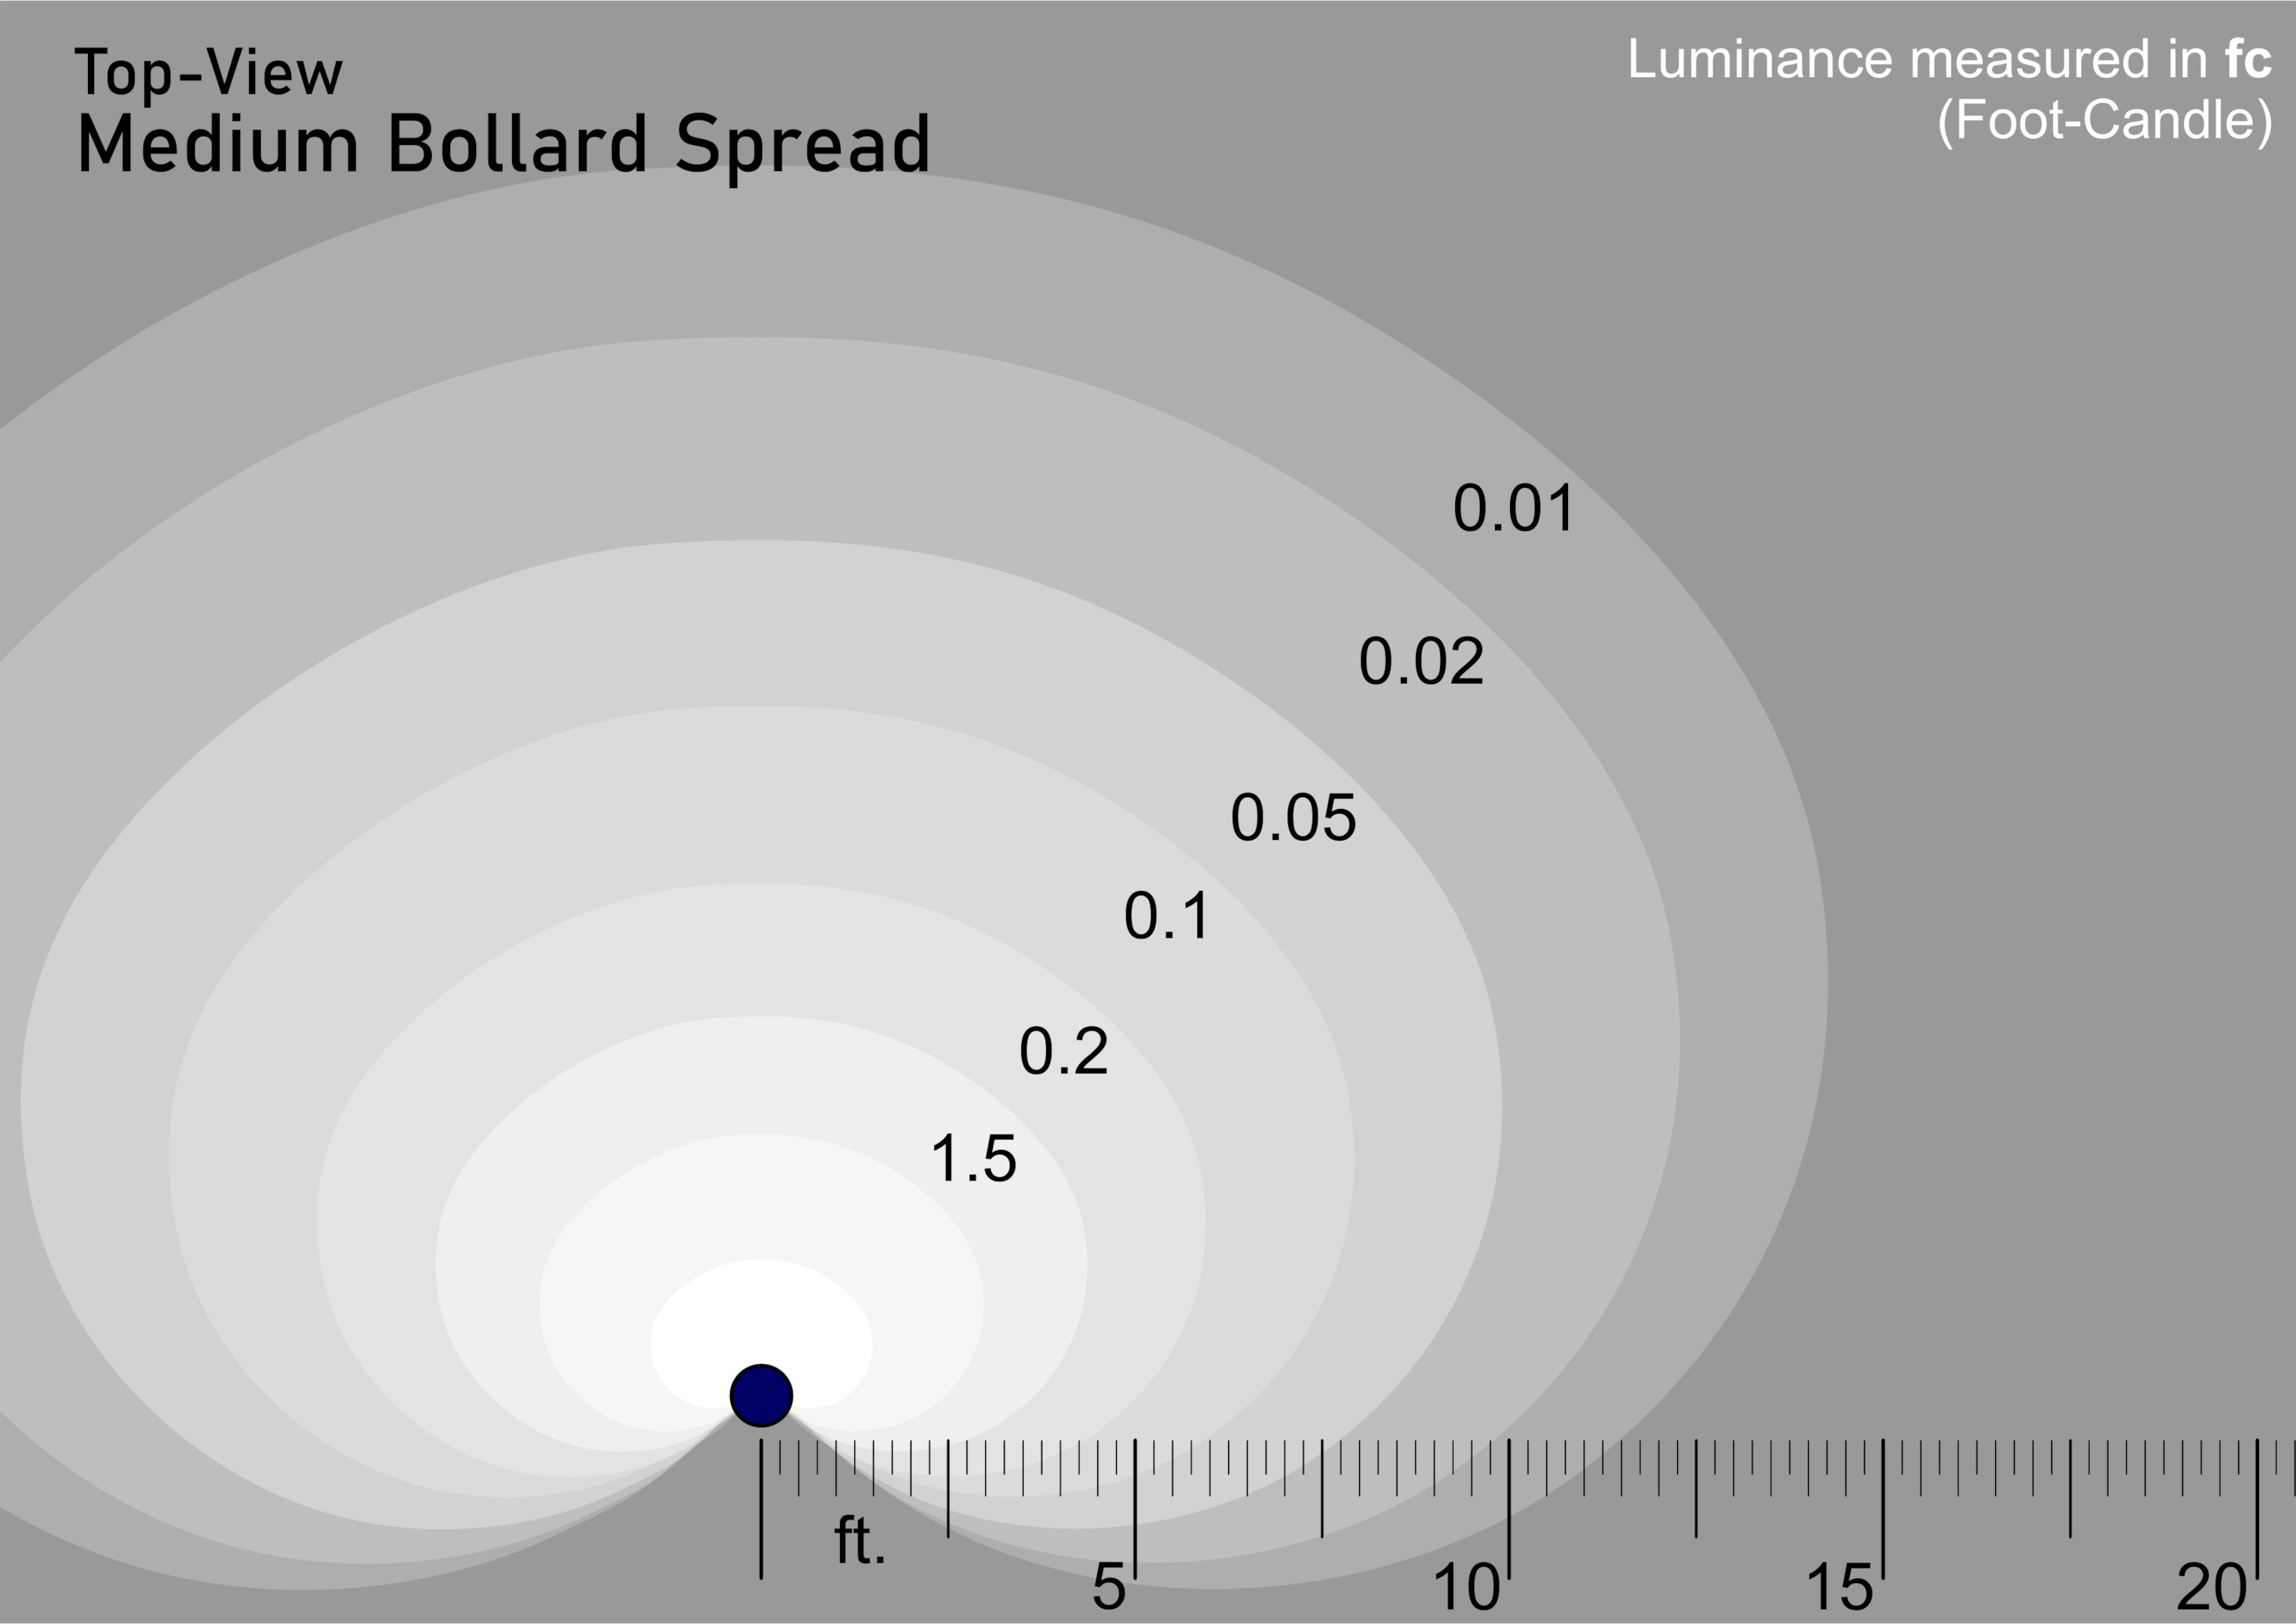
Your bollard lights should be spaced such that their 2.7 lux (0.25 fc) points overlap. This setup results in uniform lighting and maximum visual comfort.

Lux or foot-candle numbers are difficult to calculate without proper equipment. Various factors contribute to the luminance calculation. The following are the most prominent factors in the calculation of luminance (lux or fc).
- Type of Light Bulbs in the Lighting Fixtures
- The wattage of Lighting Fixtures (Brightness Factor)
- Lumene Efficiency of Lighting Fixtures (Lumens per Watt)
- Light Fixture Shielding (Beam Angle Factor)
If you still find the process of Light Spacing confusing, here is a table to help simplify the process.
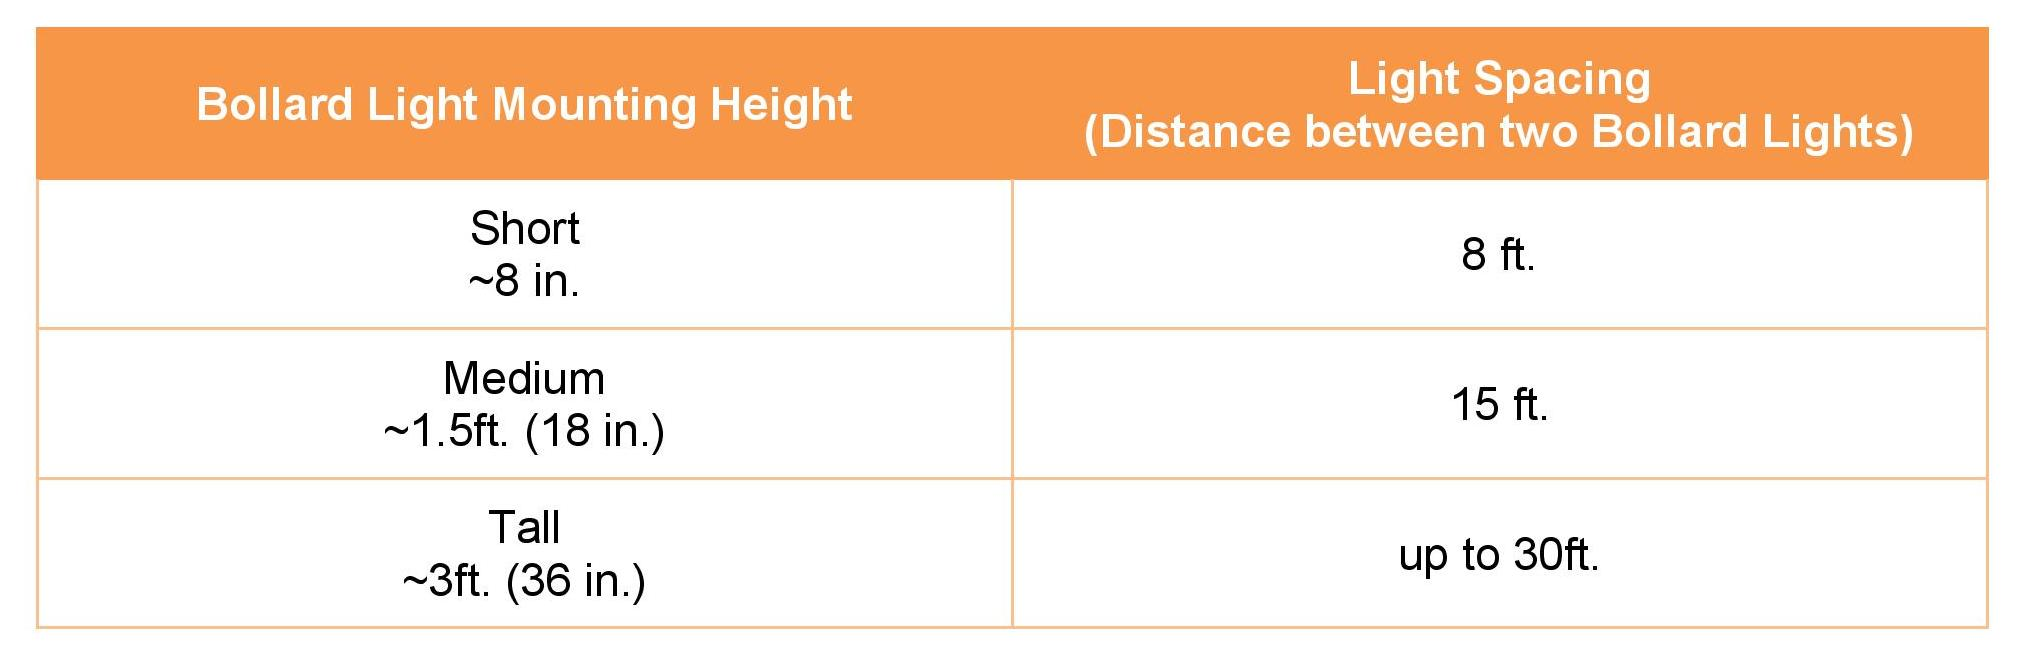
It’s important to note that for some applications, you may not have a choice in light spacing. Cost is a significant factor that can affect light spacing. Short light spacing will result in an increased number of light fixtures. So, to maintain a strict budget, you will have to use wider light spacing and select your bollards accordingly.
Light Direction
The direction of light beams can be controlled through strategic shielding techniques. You place a cover/shielding around your LED light and direct it in the desired direction. The size and shape of this shielding can vary significantly too.
You can further divide light direction into two categories.
Directional Bollard Lights
Directional lights are a direct result of light shielding. More shielding will result in a narrower light spread, while less shielding will result in a broader light spread.
The narrow light spread will have a brighter output since most light is directed in a single direction. This type of lighting is ideal for maximum brightness and uniform illumination. But this method has one major drawback, dark shadows. If you have a bright light source directed in a single direction, it will naturally create darker shadows in the surrounding.
Wider light beams mitigate most of the drawbacks of narrow light spread. They have an intense illumination in the front that is bright enough to be comfortable but not too bright that it would result in pitch-black surroundings.
Shielded and directional lighting best suits outdoor house pathways and garden paths.
Non-Directional Bollard Lights
Non-directional lights are unshielded lights that illuminate a space equally in all directions. This style is generally limited to tall bollards, with some exceptions for medium-sized bollard lights. Unshielded light is beneficial for uniform ambient lighting of walkways. Ambient lighting is better for people recognition, making non-directional lights the preferred option for public spaces. Non-directional lights are also beneficial when highlighting nearby landscapes or architecture.
Customization
The final step in setting up bollard lights is customization. So far, we have been focusing on the logistics of bollard lights, the height, distance, and direction. Now we can focus on personalizing your bollard lights and selecting options that yield the best aesthetics, ambiance, and comfort.
Following are the three most accessible ways to customize your bollard lights.
Bollard Design
Design selection is the most exciting part of this entire process. Once your specifications are dialed in, you can select the luminaire designs that best match your style.
- For commercial applications, you can select a clean and sleek-looking design to best match the architectural design of your building.
- For more residential applications like garden walkways, you should look into minimalist designs that blend into the background.
Color Temperature
White LED lights can have a subtle shade of yellow or blue present. Color temperature describes the appearance of light and qualifies the amount of yellow or blue hue.
Color temperature is measured in Kelvins (K), Lower values result in warmer or yellower light, and higher values result in cooler or bluer light.
You can drastically change the atmosphere and mood of a space by changing the color temperature.
- Warmer lights create a cozy feeling and increase visual comfort. They are particularly suited to house pathways or garden walkways.
- Cooler lights are typically used for better illumination and work-focused spaces. Bollard lights with cooler LEDs in public areas like parks, paths, or large buildings.
Warmer lights are generally the preferred choice for most situations, with few exceptions.
If you need help with the color temperature, here is a simple chart.

Brightness
Brightness is the easiest method of customizing your bollard lights. We have already talked about shorter bollards having a brighter light output. But you don’t have to restrict yourself to certain bollard heights to take full advantage of LED brightness.
Since bollard-style light fixtures use LED lights, you can swap the existing LED for a higher wattage. This can help you add brighter lights and increase light spacing distance.
You need to consider two elements before changing your bollard’s brightness.
- Your light manufacturer might not offer a swappable LED design.
- LEDs can run very hot at high wattages; some bollard fixtures may not be suited for high wattage LEDs.
- If your Lighting fixtures are too bright, they will create glares and result in safety issues.
How to Install Bollard Lights?
Bollard light installation is simple in theory, but it requires lots of tools and skill to do correctly in practice. It would be best to rely on a trained electrician to handle the installation. However, if you like to do things yourself or are interested in the actual process. Here is a simple guide on bollard light installation.
Step 1) Dig a Hole
Bollard-style light fixtures must be mounted upright, requiring a solid base for support. Concrete or cement is your only choice for a safe and secure base.
First, you must dig a hole into the ground to hold the cement base. The diameter and depth of the hole will depend on your bollard size. But as a general rule of thumb, the hole should be around 1ft. (12 inches) wide and at least 2 ft. (24 inches) deep.
Precautions
- Check the ground around the dig site for underground wiring or water lines.
- Oversized and heavy items like tall bollards require larger cement bases.
Step 2) Wiring
Next, you must run some conduit through the hole before pouring the cement. Run your wires from your distribution box to the base hole and through the conduit. Since these wires will be underground, ensure they are adequately shielded and weatherproofed.
You must leave at least 3 ft. of extra wire length for your bollard light. Excess wire length is always recommended for any type of electrical installation.
Precautions
- Do not connect the wiring to the main distribution box. You can do this after you have connected the led bollard lights.
- The underground wiring needs to be deep enough for safety reasons. We recommend at least 18 inches in the ground.
Step 3) Pour the Cement
Now it’s time to pour the cement into the hole and make an excellent sturdy base for your bollard fixtures. But before you do so, add anchor bolts in the hole for later use. Most bollard light manufacturers provide a template to help you easily center your anchor. Try your best to keep the anchors leveled as you pour the cement.
The cement base can be either a cylinder or a box, whichever shape is more convenient to build; after all, it will be underground and out of sight.
Precautions
- Insert cardboard shapes in the ground to help pour the cement into the hole.
- Double-check the placement of the hole. Once you pour the cement, re-adjusting the position won’t be easy.
Step 4) Bollard Base Installation
Bollard fixtures come in two parts, a base plate and a shaft. First, you need to install the base plate on the anchors. Use washers to keep the base plate level and firmly tighten the nuts on top.
Precautions
- Make sure the nuts are properly tightened.
- The wiring should not interfere with the base plate.
Step 5) Install the Bollard Shaft
Once the base plate is secured to the cement base, you can attach the bollard shaft. Pass the wiring through the post and pull out from the top. Secure the shaft to the base plate with the provided screws.
Precautions
- You may require different-sized screwdrivers and an Allen wrench.
Step 6) Installing the Bollard Light
Now you need to install your LED light bulb into the top frame of the bollard. Connect the wiring according to your bollard design. Do a final check for any lost screws or nuts. Ensure everything is tightened correctly and the writing is out of sight.
Finally, connect the other end of the wiring to the distribution box and test out your light.
Precautions
- Just make sure your bollard fixtures are correctly secure and watertight.
Bollard Light Recommendation/Examples
Bollard fixtures come in various styles, shapes, and sizes. Certain brands offer similar fashions in multiple sizes. It can be difficult for a beginner to navigate through all these options. So we have compiled a list of bollard lights for various applications to help you select the best choice for your needs.
- Tall Garden Bollards

We recommend some simple ones like a tall aluminum bollard with a minimalist design for Gardens. This elegant design fades into the background and lets your garden be the center of attention.
- Driveway Lighting

As far as paths are concerned, driveways are pretty broad. After all, they need to accommodate the width of a car. We recommend a medium high design with a solid downward light. This model is quite popular in the continental United States.
- Commercial Building Lighting

There is only one choice for commercial buildings, a medium-tall stone and concrete design. It’s a simple design that will complement any outdoor path and sidewalk. It comes in 15 and 27-inch sizes with an excellent 120°-wide beam spread.
- Low Voltage Bollard Light Fixtures

If you want something unique, we recommend this high-quality teak wood design. It comes in low voltage options and can run on AC and DC supplies.
- Solar Bollard Lights
Solar bollards are an excellent way to save energy. This model has a 120° beam angle, runs on 7.5W, and is IP65 rated.
Conclusion
At an initial glance, installing a bollard light can be a real challenge. But once you know the basics, the entire setup becomes considerably easy to manage. Just be sure to do the proper prep work beforehand. Mounting size selection, light spacing, and light direction are all decisions you need to make before you start working on the installation.
We hope this guide has taught you how to light up a path with bollard lights. If you are looking for a bollard light supplier, we recommend checking out RC Lighting. We have an excellent selection of commercial and residential Bollard Lights.
We have no minimum order limit and can send you a sample before placing the order. Contact our customer support for details on the shipping or freight charge of bollard fixtures. Your country’s import laws determine shipping fees and shipping surcharges.
To get a customized quote on all products sitewide, Contact Us Now!