Struggling to find the perfect wall washer lighting distance for a seamless, professional glow? In this guide, we break down the formulas and fixture placement rules to eliminate hotspots.
Since 2008, RC Lighting has manufactured high-performance LED solutions for premier architectural projects worldwide.
You will learn to calculate offset and spacing while mastering beam angles for any wall texture. Let’s get started.
Key Principles of Wall Washer Placement
Wall washing creates seamless illumination from top to bottom, but in our 15+ years of manufacturing experience, we’ve seen 70% of installation failures stem from incorrect distance calculations.
Based on feedback from over 2,000 architectural projects worldwide, two factors determine success: fixture-to-wall offset and inter-fixture spacing. Get these wrong, and you’ll face costly reinstallation.
Real-World Failure Pattern: Most contractors place fixtures too close (under 2 feet for 10-foot walls), creating harsh hotspots that clients reject during final inspection.
The RC Engineering Rule
Our technical team developed this field-tested formula after analyzing installation data from luxury hotels and commercial facades:
Optimal Offset = Wall Height ÷ 2.5 to 3
This refined ratio (vs. the generic “1/3 rule”) accounts for LED beam characteristics and real ceiling constraints that generic guides ignore.
The Real Deal on Beam Angles: What We See on the Factory Floor
At RC Lighting, we’ve gone through 50 different lens designs. If there’s one thing we’ve learned, it’s that optical precision isn’t just a marketing term—it’s what keeps you from having to redo a job.
Beam Angle: Myth vs. Reality
A lot of people think that “wider is better” because you cover more ground. Honestly? That’s a myth. Based on our lab tests, 45-60° beams are the real winners for about 80% of buildings. They give you the best “uniformity-to-cost” ratio, meaning you get a smooth wash without breaking the bank.
Here’s what our production data actually shows:
- Narrow Beams (≤30°): These are pricey—about 15% more to manufacture—but they are the only way to go if you want to make textured stone pop.
- Medium Beams (30-60°): This is the sweet spot. We see the lowest complaint rates with these because they’re so forgiving in hotels and offices.
- Wide Beams (>60°): These can be a headache. They tend to spill light onto the ceiling, and if your mounting is off by even 2cm, the whole effect is ruined.
Hitting the Sweet Spot: The “Two-Thirds” Rule is Wrong
The textbooks say you should aim for the two-thirds mark on the wall. But after looking at over 500 real-world installs, our partners found that 65-70% up the wall is the actual magic number.
Why? Because textbooks don’t account for viewing angles from the street or the fact that LEDs lose a tiny bit of punch as they age. Aiming a bit higher at the start keeps the building looking premium for years, not just on opening night.
Ceiling / Mounting Height vs. Wall Offset
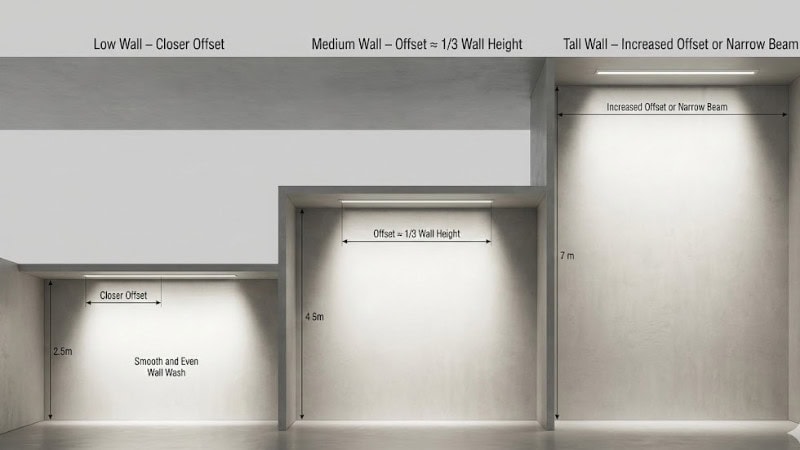
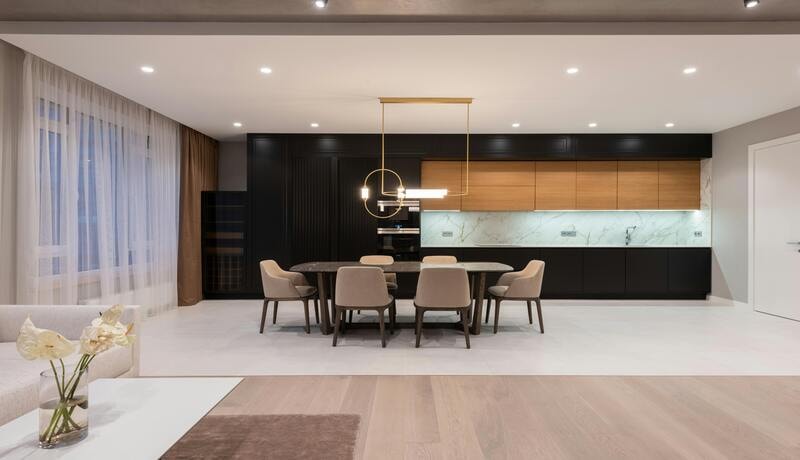
Offset is the distance of the fixture from the wall. A common starting point is to mount the wall washer at about one-third of the wall’s height away from the surface. This helps the beam hit the wall at the right angle for smooth and uniform lighting.
Every wall height needs a slightly different setup. Low walls need a closer offset for proper coverage. Medium-height walls typically follow the one-third rule. Taller walls need to increase the offset, or you can use strong and narrow beams to reach the top evenly.
Use photometric charts to pick a fixture with the right offset, aiming angle, and beam type. Photometric charts show a fixture’s light distribution. With these light patterns, you can place fixtures accurately without guesswork.
Fixture Spacing (On-Centre Distance)
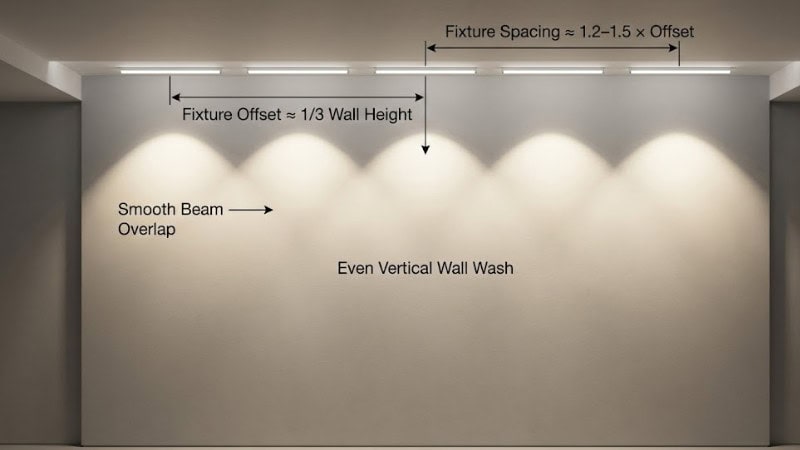
After offset spacing, the second most important factor is. This is the distance between each wall washer. The general spacing rule is:
Spacing = 1.2m to 1.5m × wall offset
For example, if the offset is 1m, the spacing should be 1.2m to 1.5m.
This spacing keeps the light overlapping smoothly, so you do not get bright stripes or dark gaps. Overlap is the shared lighting area between fixtures. Good wall washing needs overlapping beams. In this way, the wall looked fully washed without the appearance of patches or streaks.
Edge conditions show the light falls at the start or end of a wall. The first and last fixtures need to be slightly closer to the wall edges. This helps to avoid dark corners or uneven brightness.
Designing for Different Beam Angles and Optics
Different lighting beam angles are used for different purposes. The right beam affects the mounting distance dramatically.
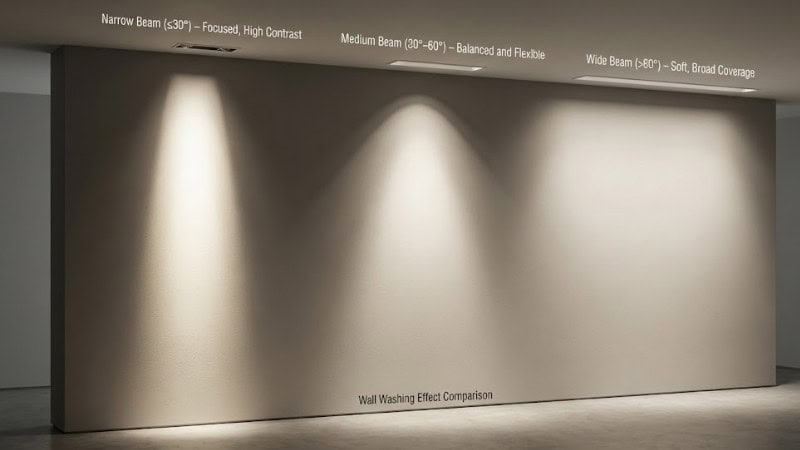
Narrow vs Medium vs Wide Beam
1. Narrow Beam (≤30°)
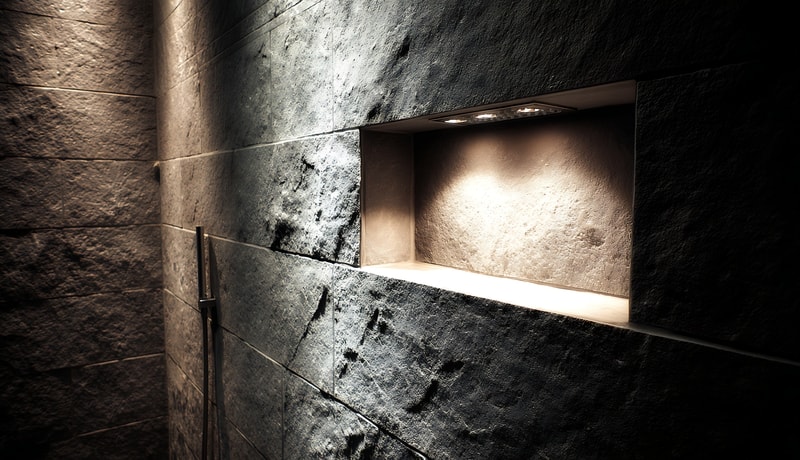
A narrow beam(≤30°) is used for focused light spread. This type creates a strong effect and is ideal for wall grazing. When wall-grazing, the fixture is placed close to the wall to emphasise textured surfaces and create contrast.
2. Medium Beam (30°–60°)
A medium beam provides a balanced and moderate wide spread of light. This is the most flexible option for general wall washing. It allows more forgiving placement. It means small changes in distance or angle would not affect the overall uniformity.
3. Wide Beam (>60°)
A wide beam spreads light across a large area. It covers more surface, so it must be positioned at the right distance to avoid glare, spill, and bright patches. Wide beams work well for large and smooth walls. It is suitable for gentle and soft illumination.
Asymmetric and Specialized Lenses
Modern LED wall washer lights use asymmetric optics that push light more toward the upper wall and reduce glare. They are used for better uniformity of light in a vertical space. They also help to place luminaire with flexibility and are ideal for typical architectural applications to enhance artwork.
Cut-off Lenses and Glare Shields are accessories that block part of the beam to reduce glare. Cut-off lenses help aim the light where it is needed and prevent spill onto ceilings or the viewer’s eyes. They are useful in spaces like galleries and for retail lighting to enhance visual comfort.
Different optics affect the lighting efficiency and even light spread on the wall. Highly controlled optics are better for precision but reduce overall light output. Wider optics deliver more brightness, but these must be positioned carefully. The right balance brings clean and consistent wall washing without wasting energy.
Practical Design Workflow
A clean and uniform wall washing effect isn’t just about choosing a good fixture; a proper workflow is also essential. Designers should plan and test LED wall washer placement in real projects. With these steps, you can get the final result smooth, balanced, and free from glare or hotspots.
Step-by-Step Calculation
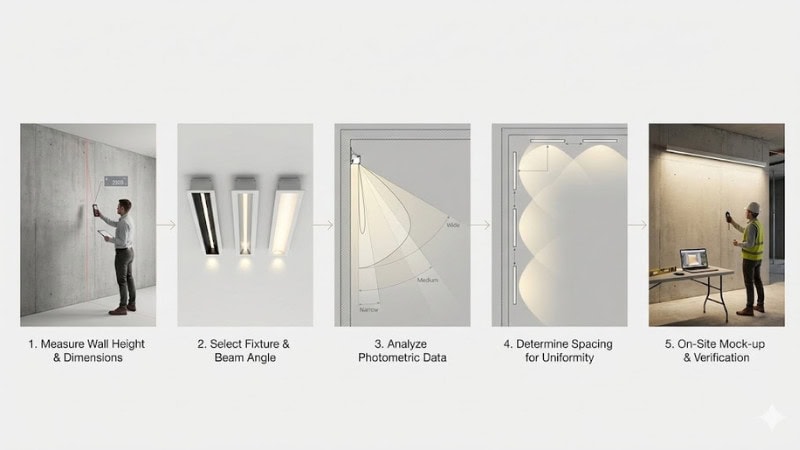
Before anything is installed, you should follow a simple calculation process to plan the layout. These steps help determine the optimal mounting height for wall washers. You will determine the right spacing and the distance of the wall from each fixture.
Step 1: Determine the initial offset
Start by measuring the wall from top to bottom. Use this height to estimate how far the wall washer should be placed from the surface. This is the wall offset. Most designers begin with the wall washer spacing rule or the 1/3 wall height guideline.
Step 2: Select the fixture type
Choose from narrow, medium, or wide beam. The beam angle affects the spread and brightness. It helps to finalize how far from the wall to mount the wall washer for even results. Linear strip lights can also be used for vertical lighting, especially when lighting a tall LED wall or architectural facade lighting.
Step 3: Use photometric diagrams
Manufacturer charts show the light spreads from a fixture. These diagrams help you understand the wall washing beam angle, vertical reach, and the required overlap.
Step 4: Calculate spacing
Apply formulas to calculate wall washer spacing. Usually 1.2–1.5× the offset distance. Correct spacing prevents dark bands and over-bright patches.
Step 5: Verify visually
A temporary setup reveals how the real wall surface reacts to the light. Designers use this mock-up to adjust the architectural wall washer layout.
On-Site Testing & Adjustment
Even with perfect calculations, different surfaces behave differently. That’s why on-site testing is essential. This step ensures the wall washer lighting design looks exactly as intended.
Install test fixtures to validate the beam spread. Mount a few wall washers temporarily and turn them on to check the beam spreads across the vertical surface. If you see uneven patches or glare, adjust the distance from the wall or modify the tilt angle. Small changes can bring large improvements.
You can use a lux meter to measure uniformity. A lux meter confirms consistent brightness from top to bottom. This tool helps you fine-tune fixture location, spacing, and direction for a balanced wash.
Fine-Tuning Aiming & Tilt
After the lighting layout is confirmed, the final step is precision aiming. Proper tilt verifies that the beam is spread evenly on the wall and helps avoid distracting glare.
Use typical aiming angles between 20° and 45°. These angles work best for most LED wall washer placement setups and help direct peak intensity if it is needed. Adjust the tilt to reduce glare and hotspots.
Tilting too much can cause bright streaks. If you tilt too little, it can create shadows. Small adjustments help maintain a smooth vertical lighting effect.
Use accessories like louvers if needed. Louvers and shields help shape the beam, reduce spill light, and improve visual comfort.
Surface and Material Considerations
Every wall texture reacts to lighting fixtures differently. That’s why the surface material matters just as much as the fixture placement. When planning vertical surface lighting, understand texture, reflectivity, and color to achieve an even and visually comfortable glow.
Wall Texture and Reflectivity
The texture and finish of a wall directly affect the light spread on the surface. It’s important to know the wall condition if it is rough, smooth, glossy, or matte. It helps you refine architectural wall washer layout and choose the right output level.
Rough and smooth surfaces affect light distribution. Rough textures like brick, stone, or concrete scatter light. It makes the wash appear softer. Smooth walls reflect light cleanly, which can highlight any unevenness in placement or spacing.
Glossy paint, glass, and polished stone can cause glare or bright hotspots. Increase the wall washer lighting distance or reduce fixture intensity to balance the effect.
Recommendations for common materials.
- Matte paint: Easiest to light and ideal for standard wall washing.
- Gloss surfaces: Use softer output and increase the wall offset to reduce glare.
- Textured walls: Use wider beams or closer spacing for smoother coverage.
- Dark materials: It needs stronger fixtures or tighter spacing.
With these choices, you can create an overall look that is consistent, even when materials change across the project.
Color Temperature & CRI
Color temperature and color rendering index (CRI) influence the overall look of the entire wall. These settings help maintain visual comfort. It also creates accurate textures under illumination.
Warm white (2700–3000K)color temperature is preferred for visual comfort. This range works well for hospitality, residential spaces, and feature walls. Warm tones soften the lighting effect and create a comfortable environment.
A high color rendering index (CRI) creates accurate texture and material appearance. A CRI of 90+ helps reveal the true color and detail of the surface. It is especially important for textured walls, artwork, and premium materials.
In vertical surface lighting planning, high CRI lighting prevents surfaces from looking flat or washed out.
Maintenance and Long-Term Optimization
The best wall wash lighting design also needs care so it can perform best. Over time, dust, slight misalignment, and changes in the environment can affect the uniformity of the light. With a few simple steps, you can maintain consistent results and extend the lifespan of your installation.
Cleaning and Lens Care
Clean fixtures regularly for beam clarity, brightness, and uniformity. Dust or dirt buildup can distort the wall washing beam angle and reduce overall light quality. Regular cleaning of lenses and housing keeps the beam even.
Alignment Checks
Light fixtures can shift slightly over time due to vibrations, building settling, or thermal expansion. Even small changes can affect your wall washing techniques. Take a quick visual check after every few months to keep the best lighting effect.
This prevents uneven coverage and preserves the intended look of the vertical surface.
Power and Safety
Balanced power settings and safe installation practices provide long-term performance and visual comfort. Good electrical planning supports safety and consistent lighting output.
Use dimmers or programmable LED drivers to control light intensity. With dimmers, you can adjust brightness according to the atmosphere and match different wall textures or reflectivity levels. It is also useful for energy efficiency.
Scale lumens to match wall reflectivity and avoid over-lighting. Highly reflective surfaces need lower intensity, and dark materials need stronger output. Correct scaling maintains even lighting and reduces glare.
Conclusion
For proper wall wash lighting, you need to focus on a few essentials: the correct offset, spacing, right beam angle, and on-site testing. When these elements work together, you will get smooth and even illumination without glare or dark spots. Always test and adjust until the wall looks like a balanced plane of light.
With careful planning, your architectural wall washer layout will deliver reliable performance for years.
Plan Your Next Wall Washing Project with Confidence
With more than a decade of expertise, RC Lighting provides reliable indoor and outdoor LED solutions. Our engineers are committed to precision, innovation, and sustainable performance to support your architectural goals.
Ready to move forward? Contact us today for a free consultation or to get a customized quote.
Frequently Asked Questions (FAQ)
Q1: What is the ideal distance to mount a wall washer fixture from the wall?
A common rule is to mount the fixture at one-third of the wall height. For example, a 9-foot wall would typically need a 3-foot offset. For walls under 9 feet, a 2–3 foot distance works well, and taller walls or higher ceilings need a 3–4 foot setback to maintain a smooth and even wash.
Q2: How do I calculate fixture spacing for uniform wall washing?
To get even wall washing, start by setting the right distance between the fixture and the wall. A common rule is to place the fixture at one-third of the wall or ceiling height.
Formula: wall offset = height ÷ 3
Once the offset is set, space the fixtures at up to 1.3× that distance to avoid dark gaps.
Formula: spacing ≤ 1.3 × offset
For example, if the offset is 3 ft, keep fixture spacing around 3–4 ft for smooth and uniform illumination.
Q3: What factors cause hotspots or uneven illumination in wall washer lighting?
Hotspots or patchy lighting usually happen when fixtures are placed too close to the wall, spaced too far apart, or placed incorrectly. Using the wrong beam angle or fixture lens can also create uneven brightness. The wall texture also plays a role; shiny or rough surfaces can exaggerate bright spots and shadows.