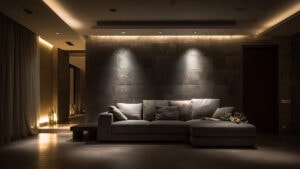
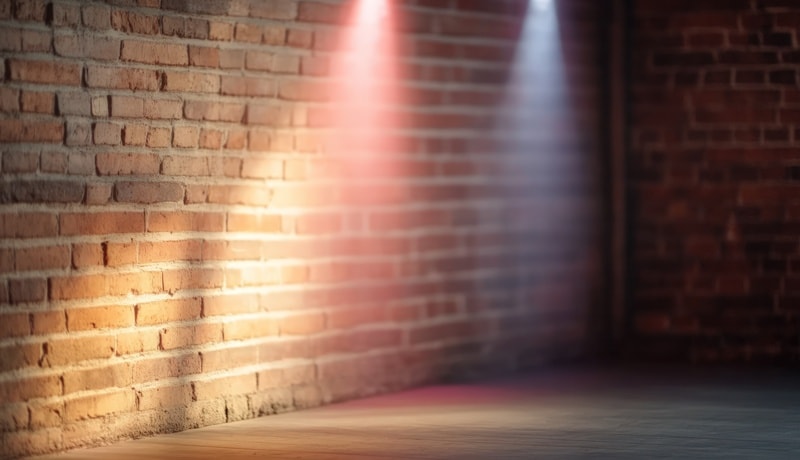
Wall grazing lighting is a lighting technique that highlights texture by placing fixtures close to the surface. But if not done correctly, it creates distracting hotspots that break the visual flow.
This article will give you details on why these hotspots are and overcome them with proper engineering. Finally, you’ll know the design strategies to achieve smooth, uniform, and professional wall grazing lighting.
Understanding the Root Causes of Hotspots in Grazing Applications
Wall grazing is a landscape lighting technique. It is often used to highlight architectural surfaces at night. The hotspots are due to technical decisions about fixture placement, beam behavior, and lumen output.
If these factors are not balanced, the wall grazing effect becomes patchy. Bright spikes are produced rather than smooth and vertical grazing.
Here are some of the major engineering causes of these problems.

Fixture Placement and Distance to Wall
One of the main factors for hotspots in wall grazing lighting in vertical surfaces is fixture placement. Mounting lights too close, less than 12 inches, pushes too much intensity into a small area. This lighting style results in a blown-out streak on a surface. It is followed by an abrupt falloff that looks unprofessional and produces glare.
The beam angle also changes how the light behaves. A narrow beam makes the light hit one spot too strongly, which can create hotspots. Incorrect spacing between fixtures can make the light overlap too much. It causes one or two bright lines to appear on the wall.
To avoid this, designers should follow a simple rule:
- Do not aim the light too sharply, and do not place fixtures too close together.
- Keep a reasonable distance and soft aiming to get smooth, even wall grazing.
Beam Angle and Optics Choice
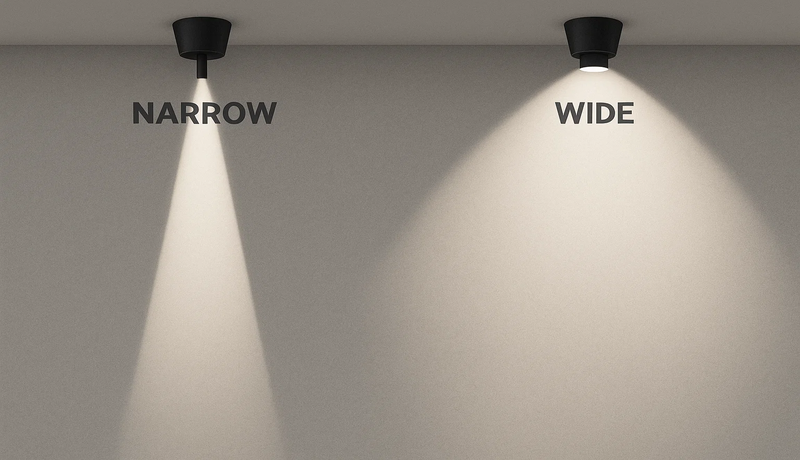
The beam angle determines the distribution of light across the wall surface. Choosing the wrong angle is key to walls grazing hotspots. Narrow-angle beams isolate energy by concentrating it in an intimate band. It’s perfect for dramatic effect but risky when misaligned.
Wider beam angles diffuse the light much more gently, thus avoiding intense patches. It balances wall washing effects. Wide-angle options are a smart choice for smooth surfaces or to minimize glare in wall grazing.
Designers typically use asymmetric optics, grazing lenses, or color-over-angle asymmetric optics. They are used in professional applications, especially for architectural lighting design. These optics move light downward in a controlled pattern. So vertical grazing will remain visible without generating bright hues.
The peak intensity can be softened. For these diffusers, cut-off shields, and small glare-control tools are used. These optical tools allow you to highlight texture and create shadows. They enhance architectural features, avoiding unnecessary harshness.
Lumen Output and Fixture Intensity
The excessive lumen output can create hotspots on textured walls. It can happen even if the product is placed perfectly and well aligned with the beam angle. When a wall grazer LED emits more light than the surface can handle, the top portion of the beam becomes too bright. It becomes more visible on textured surfaces such as stone pillars, brick, or rough concrete.
Outdoor lighting scenarios often amplify this issue because darker conditions brighten hotspots. In order to accurately determine the level of light, the wall height, material, and intended effect must be aligned.
Glossier or light-colored materials would be brighter. They would need lower intensity to avoid hotspots. A matte stone surface absorbs more light. It can tolerate higher lumen output without producing glare.
Engineers often use gradual dimming, zoning, or lower-output LED wall washer lights to control light. This lighting technique reduces the visual impact of too much lighting. It does not overwhelm the viewer and also keeps the smooth grazing effect across the wall.
Design Strategies to Minimize Hotspots
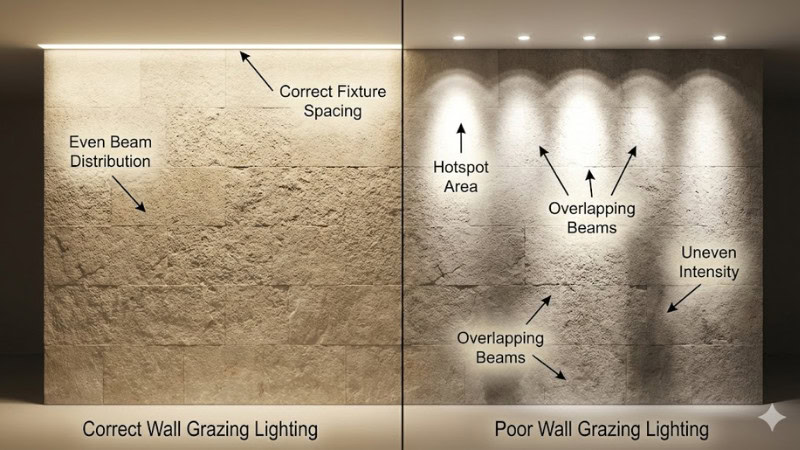
Proper grazing adds visual interest by emphasizing depth, rhythm, and material contrast. Correct grazing lighting technique helps control viewer focus by guiding the eye along the surface texture.
When you have knowledge of what causes hotspots, it is necessary to apply the appropriate design strategies. These techniques are useful for smooth, even wall grazing lighting without a bright patch, glare, or shadow.
Proper Spacing Between Fixtures
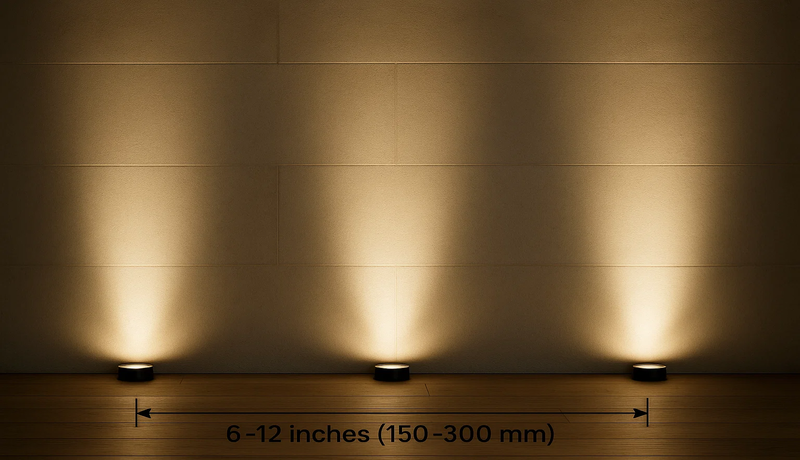
The simplest way to avoid hotspots is by correct spacing. When the lights are closer to the wall, the beam becomes narrower and textures appear more dramatic.
Most of the grazing fixtures are placed 6-12 inches (150–300 mm) from the wall. The distance lets the light beam spread across the surface. With offset as well, the distance between fixtures also matters. Center-to-center spacing should match or follow the distance from the wall.
This balances the beams, avoids uneven intensity levels, and has the clean wall grazing effect. Some designers usually create a small mock-up before the final installation. This test layout helps to check for irregularities, spots, or unknown hotspots so that they can be corrected quickly.
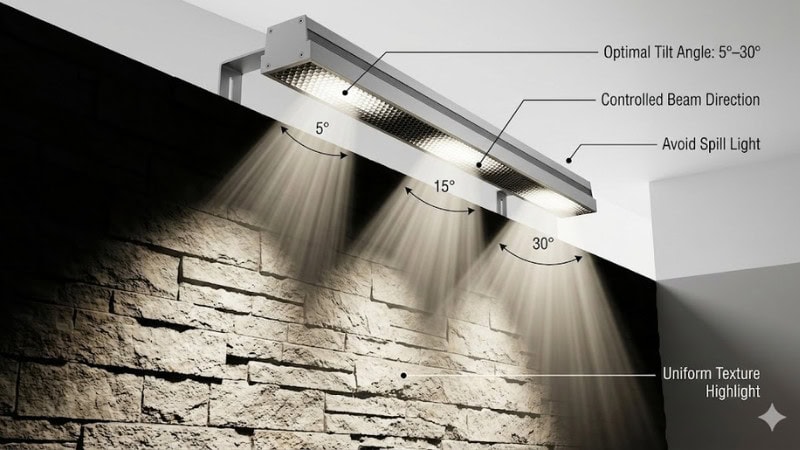
Aiming Technique and Tilt Optimization
Use precise aiming to keep the light focused only on certain elements instead of spilling across the whole wall. By positioning the beam at a moderately low to medium tilt angle (about 5°–30°), it facilitates sweeping it across textured surfaces. These prevent one area from receiving too much light while still remaining visible.
The best technique in installation is to aim one luminaire at a time. Start with the first light and scan the wall. If the beam is square, keep the other fixtures equal in height and tilt. This simple step helps avoid inconsistencies across the wall surface.
Tools like louvers, lenses, and shields help guide the beam. They minimize spill light, soften edges, and minimize glare. It makes grazing more controlled and comfortable to view.
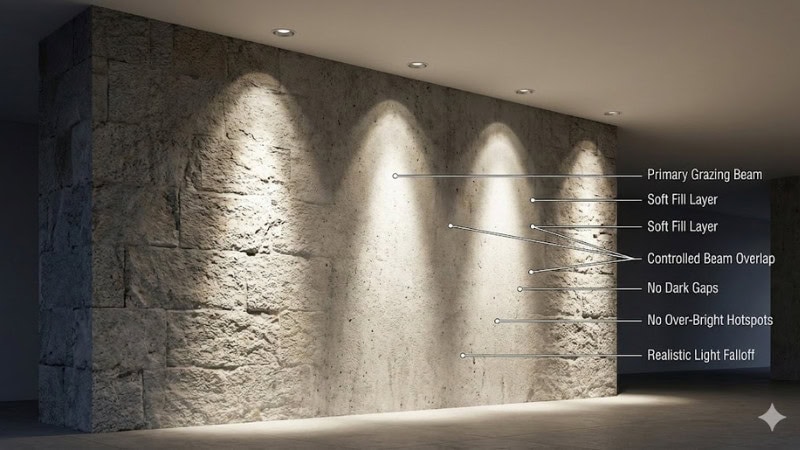
Use of Multiple Layers and Overlapping Beams
For most walls, a single grazing angle is not sufficient to cover transitions and soften harsh areas. Multiple lighting layers can solve this problem.
A common process is to use a soft wall wash or gentle upward light to smooth the transition between the brighter grazing zones and the darker areas. This results in a more natural, blended look.
A slight overlap between beams is helpful, too. The goal should be to overlap enough to reduce dark gaps but not so much that the center of the overlap becomes another hotspot.
Diffusers and asymmetric optics also reduce sharpness at the edges of the beam. These tools soften the grazing effect and make the light fall appear more continuous across the wall.
Material & Surface Considerations
The wall material can have a crucial role in grazing light. Different textures, colors, and finishes react differently to the beam. Knowing how the surface reacts helps you detect hotspots before they appear.
Texture and Reflectivity of the Wall
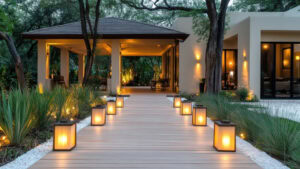
Wall grazing also works well near decorative wall hangings by enhancing their depth and shadows. Each wall surface interacts differently with light. On flat walls, improper aiming can make even small brightness variations more noticeable.
Rough or textured surfaces typically create deeper shadows and stronger highlights. This produces a more dramatic effect of grazing, but can also make hotspots appear easier to spot.
On the other hand, smooth, glossy, or reflective materials can bounce light back toward the viewer and cause glare. In such cases, lens, shield, or glare-control devices can soften the brightness and keep the wall looking even in a uniform pattern.
Every wall has a different structure. So, lighting designers would review the material in the planning stages. The small mock-up test can help you tweak the lens angle, spacing, and optical features. It matches the texture and reflectivity of the wall prior to final installation.
Color Temperature and CRI Effects
Color temperature and CRI also influence how the wall looks in grazing light. Warmer color temperatures, such as 2700K–3000 K, tend to soften the visual contrast on textured surfaces. This reduces the perceived glare. It makes the wall appear more comfortable and natural at night, especially in outdoor lighting.
A high CRI (Color Rendering Index) is also important. High-CRI fixtures ensure the color and texture of the wall are accurate. When the wall’s true details are preserved, the lighting appears smoother and more uniform.
Testing, Commissioning & Optimization
Before determining the wall grazing setup, on-site testing is needed. Real-life conditions reveal issues that cannot be seen in design software. The commissioning will ensure that you won’t have any problems with the final result.
On-Site Validation and Adjustment
After installation, you should check the wall for damage. Measure vertical illuminance at different heights to confirm the equal coverage. A slight change in angle draws attention to texture, but too much tilt can create hotspots.
Temporary brackets or adjusting mounts are used to test different positions, spacing, and tilt angles. Small adjustments, such as changing the aim and distance or moving the fixture a few inches, can remove remaining hotspots quickly.
Final Calibration and Power Controls
Designers often compare two lighting styles, wall washing and wall grazing, to decide which best suits a project. Fine-tuning the brightness helps to avoid overbright spots or the wall-washing effect. If you use dimmers, zoning, or programmable drivers, you can adjust the level of light to meet your wall texture and environment.
If hotspots still appear, lower the lumens until the beam looks smooth. Finally, record all fixture heights, angles, and settings so future maintenance is easy and consistent.
Maintenance and Long-Term Performance
The maintenance of wall grazing lighting keeps it consistent over time. Make sure to clean the lens and optics regularly because dust buildup can blur the beam and cause new hotspots. The aiming and alignment should also be checked once a year. It might change as the weather, heat, or building moves over time.
Finally, replace aging LEDs or drivers in case the output drops or the color changes, as it can change the beam pattern or the uniformity of the beam.
Conclusion
Hotspots in wall grazing usually come from bad fixture placement, poorly adjusted beam angles, and high light output. The right fixture, spacing, aiming, and adjusting brightness during installation can help to avoid this issue. The right design and maintenance can ensure that you will get clean, smooth, professional lighting every time.
Fix Wall Grazing Hotspots With Precision-Engineered Lighting
We at RC Lighting provide precision-engineered wall grazers and consistent beam optics. We built fully customizable indoor and outdoor solutions. Our products help designers, contractors, and distributors solve real lighting challenges with confidence. We also provide hands-on technical support and fast delivery to keep projects running smoothly.
Ready to eliminate hotspots and elevate your project’s visuals? Send your inquiry today or download our product catalog to explore your options.