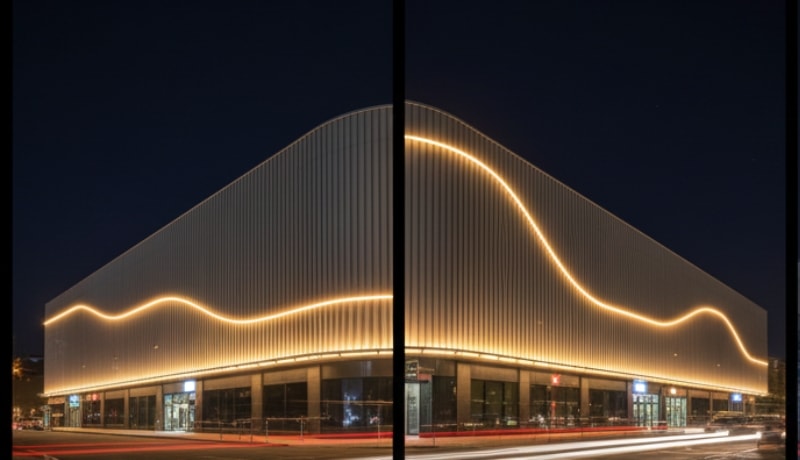
The facade is the heartbeat of a building’s identity. But a professional facade lighting project is more than just buying bright LEDs—it’s about a structured workflow that balances aesthetics, local ‘Dark Sky’ regulations, and long-term ROI.
At RC Lighting, we’ve helped architects and contractors navigate this 5-step process since 2008. This guide provides a practical roadmap to help you plan, simulate, and install facade lighting that stands the test of time.
Step 1 — Concept Development
This step generates the vision and gives a reason why the design has been created.
Understanding Client Goals
Before selecting any lighting system, clarify the purpose of the project and consider the potential for energy savings. Is the lighting mainly:
- Aesthetic: To show beauty and form.
- Functional: To enhance safety and navigation.
- Branding-focused: To improve the image and endorse the brand.
Select the architectural points and specific facade elements that you desire to emphasise. Another thing to consider is the project environment. Is it an inner city, a quiet suburb, or even a big shopping mall? This influences the intensity of light and the choice of CCT.
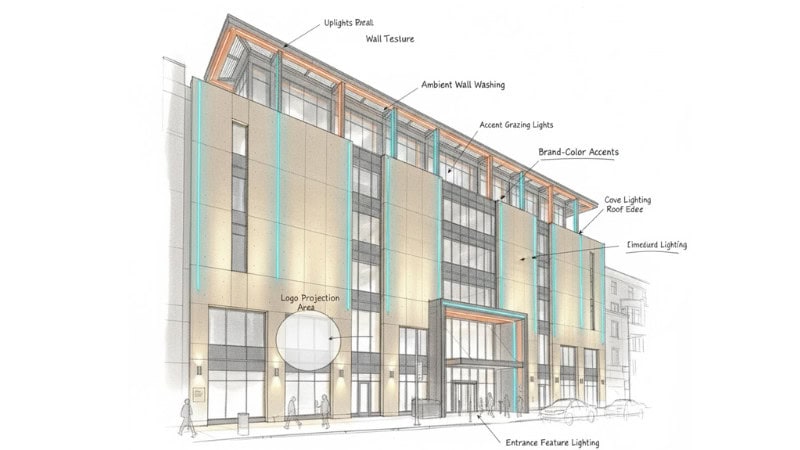
Initial Lighting Concept Sketches
The next thing is visualizing the position of the lights and their impact. Here are some lighting layers that may be used in order to add interest and depth:
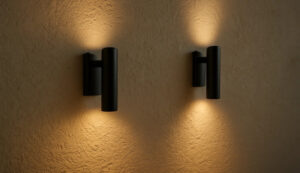
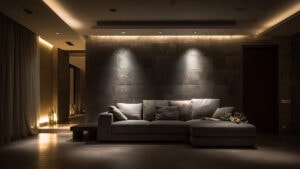
- Ambient lighting: A Typical and diffused light source.
- Accent lighting: Illuminates significant or textural elements.
- Logo or architectural lighting: On logos or special structures.
Regulatory and Environmental Review
It is a very important, non-compromising action.
Local Ordinances and Permits: Local ordinances and permits usually contain stringent laws as to light intrusion, skyglow, and the lighting of historic buildings.
Dark Sky Compliance: In environmentally sensitive areas, Dark Sky compliance, which mandates projects to follow principles that reduce light pollution, is often a requirement.
Heritage Restrictions: The building will need special permission if it is a heritage-listed building or is situated in a heritage area.
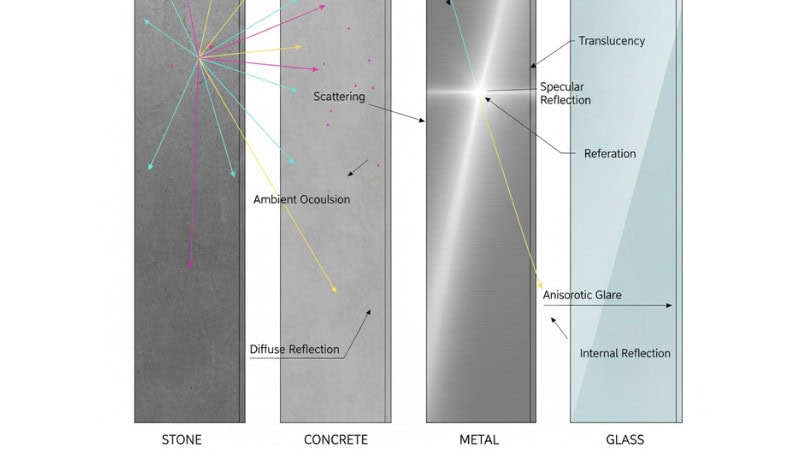
Material and Surface Assessment
The behavior of light depends on the uniform surface of the solid facades. Determine the type of wall: stone, concrete, metal, or glass. Check reflectivity, check texture, and color. This assists in the selection of the appropriate CCT and fixtures.
Step 2 — Technical Design: Choosing the Best LED Fixtures for Your Facade
Once the artistic concept has been finalized, proceed to technical planning. In this phase, the choice of fixtures and engineering is involved.
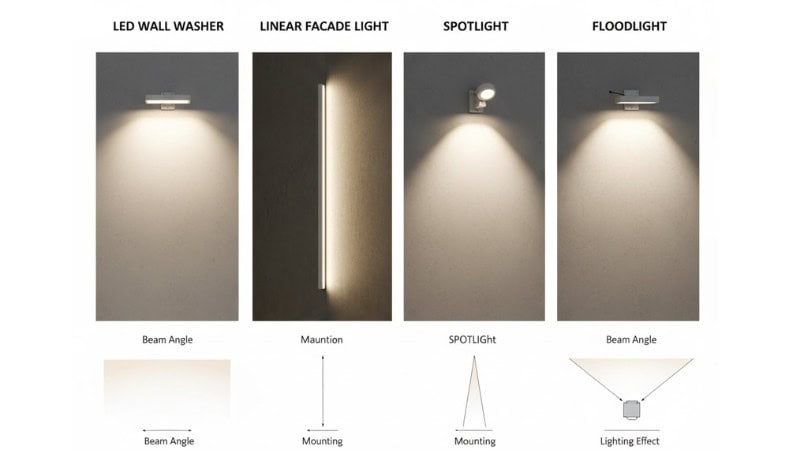
Fixture Selection
It is important to consider the proper selection of fixtures to be used to get the intended effect. Popular works of architectural facade lighting are:
- LED wall washers for Uniform light spread
- Spotlights to implement specific accent lighting.
- Linear series of light fixtures.
In the process of selection, it is important to consider the lumen output, the narrow beam angles, including projectors, and the CCT selection for facade lighting. Long-term performance is necessitated by durable and effective products.
Fixture Type Comparison for Facade Lighting
Choosing the right fixture type is critical for achieving your desired lighting effect. Here’s a practical engineering comparison:
| Fixture Type | Lighting Effect | Best For | Beam Angle | IP Rating | Pros | Cons |
|---|---|---|---|---|---|---|
| Wall Washer | Uniform, smooth wash from top to bottom | Large flat surfaces, smooth facades, creating even illumination | 30°-60° (Wide) | IP65-IP67 | Even coverage, no hotspots, excellent for smooth surfaces | Less dramatic on textured walls, requires precise spacing |
| Linear Facade Light | Continuous line of light, emphasizes horizontal/vertical elements | Building edges, columns, outline lighting, modern architecture | 15°-40° (Adjustable) | IP65-IP68 | Flexible installation, creates clean lines, linkable systems | More visible during day, higher installation complexity |
| Floodlight | Powerful, broad illumination | Large areas, tall buildings, security lighting, general illumination | 40°-120° (Very Wide) | IP65-IP66 | High lumen output, covers large areas, cost-effective per lumen | Can create glare, less precise control, energy-intensive |
| Spotlight | Focused, concentrated beam | Architectural details, logos, sculptures, accent features | 8°-25° (Narrow) | IP65-IP67 | Precise highlighting, dramatic effect, low power for small areas | Limited coverage area, requires many fixtures for large surfaces |
This quick comparison helps you pick the right fixture without overthinking it. If you want a smooth, even light, go with wall washers. If the building has strong vertical or horizontal lines, linear façade lights usually work better.
Floodlights are great when you need power and coverage, while spotlights are perfect when you only want to highlight one strong architectural detail. The goal is to match the fixture to the effect you want — not the other way around.
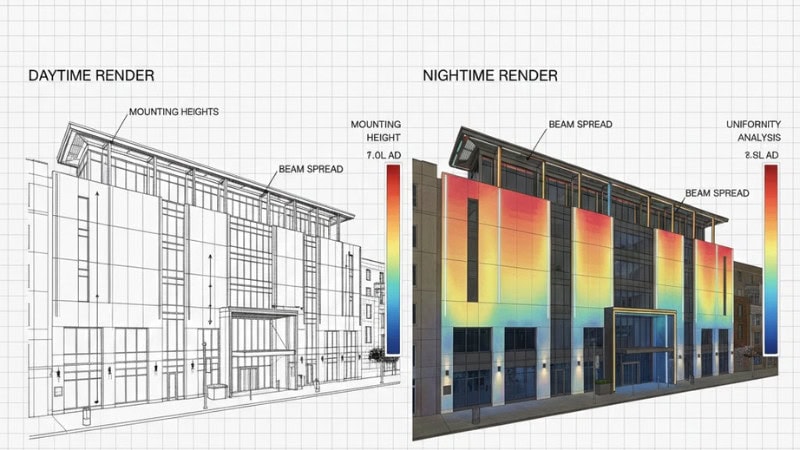
Photometric Analysis and Simulation
This is where the design is tested digitally and then physically installed. The distribution of lights on the facade is simulated with specialized software. This analysis is used to:
- Change the mounting distance, facade lighting, and distance.
- Maximize aiming angles to avoid hotspots.
- Make sure there is uniformity in light and bring out better architectural features.
How to run a simulation
If you’re doing your own simulation, here’s the simple workflow most designers follow:
- Start by importing building drawings or a 3D model into the software.
- Place your fixtures with the mounting height and distance you expect to use on-site.
- Adjust beam angles and aiming until the surface looks even.
- Run uniformity checks to make sure there are no hot spots or dark patches.
- Export daytime and nighttime renders so everyone can visualize the final look.
Even a basic simulation can save you a lot of guesswork and prevent expensive changes later.
Electrical Design
Develop effective and risk-free electrical schemes. The electrical design includes wiring routes, voltage, and power consumption for illuminating facades. It also includes intelligent features, dimming, time programming, and color control. Safety and building codes are also important when choosing facade lighting design.
Budget Planning and Cost Considerations
Knowledge of the cost structure aids in realistic planning of the project and in preventing cost overruns. Here’s what to expect:
Fixture Costs (unit, estimated amounts)
- Wall Washers (LED): $80-400 based on output, brand, and features.
- Linear Facade Lights: 50- 250 per meter.
- Floodlights: $60-350, depending on wattage and control of beam.
- Spotlights: 40 to 200 dollars based on accuracy and highest production.
Installation & Wiring Costs
- Cost of labor: $50 to $150 per fixture (depends on the area and complexity, of course, it is not always the same).
- Installation of electrical wiring: $15-40 per meter or per conduit.
- Installation of brackets/hardware: $20-80 per unit.
- Weatherproofing and sealing: $200-800 for the entire project.
Maintenance Cost Estimates (Annual)
- Lens replacement: $50-200 per fixture (after every 3-5 years)
- Cleaning and inspection: $300-1000 based on the height of the building and its location.
- LED driver Replacement cost: $30-100 per driver (after every 5-7 years)
- Software updates (smart systems): $0-300/per year.
Estimation of the total project cost
On an average commercial building facade (1,000 sq m):
- Budget Choice: 15000-30000 (plain static lighting)
- Mid-Range: $35,000-70,000 (good fixtures with controls)
- Premium/Dynamic: 80,000-150,000+ (expensive fixtures that are fully RGB/DMX)
Step 3 — Prototyping and Mock-Up
Design verification is carried out by a physical on-site mock-up.
On-Site Testing
Install provisional fixtures to test functioning under real circumstances. Based on results:
- Adjust beam focus range
- Change CCT and change the movement of fixtures (where necessary).
Material Interaction Checks
Check the light levels on target surfaces (stone, concrete, glass, or metal). Check for:
- Right light; disturbing the viewers or neighbours.
- Accurate colour display
- Improved texture without flattening.
Feedback and Iteration
This is the final opportunity to make significant alterations to a solution; the last stage before the final build is the mock-up phase. Gather information with the client and team of designers. The required changes would be done and recorded, and then move to the full-scale installation stage.
Step 4 — Installation
The final design is converted into an actual place through the installation step, which can transform the appearance of the building.
Fixture Mounting and Alignment
Install all fixtures according to the approved design layout. Ensure:
- The height of the mounting is proper.
- Achieving the desired visual effect requires exact aiming, especially for fixtures with controlled optical distributions.
Electrical Connections and Safety
The most important thing in this phase is innovation and reliability. Installers must:
- Check all grounding, connections, and wiring.
- Make sure that all fittings are well waterproofed and shielded against the weather.
- Install the smart facade lighting controls, sensors, or timers as scheduled.
Documentation and Procurement
This step develops the guide on how to make the design come to life. This complete package of documents is employed to invite bids from competent electrical contractors. It includes:
Layout Plans: The detailed diagrams include the location where each and every fitting will be placed, as well as where the conduits will be run, and where each control panel should be situated.
Wiring Schematics: Schematics illustrative of the wiring of the electric controls and electrical connections.
Fixture Schedule: A list of all types of fixtures and the manufacturer, model, and wattage, CCT, and beam angle, and methods of mounting.
Specification Manual: Construction Technical descriptions of every material, fixture, and control, including performance specifications and installation guidelines.
Basis of Design (BoD): The document that includes the design intent, and the contractors have the opportunity to suggest similar products in case of the unavailability of the stated ones.

Final Testing and Quality Assurance
Checking is conducted after the installation. The team should verify the uniformity of the light dispersion and the brightness. To avoid light pollution, a general required aesthetic impact is tested.
Following this verification, small items are supposed to be adjusted, and the final settings are supposed to be recorded in case of maintenance in the future.
Step 5 — Maintenance Planning: How to Prevent Color Decay and Driver Failure
A long-term maintenance plan is crucial to ensure the lighting patterns remain effective over the years. It keeps the lighting design as brilliant and effective years later as it was on day one.
Routine Cleaning and Inspection
The lenses and fixtures should be cleaned regularly. This cleaning ensures that dirt and grime do not lessen the brightness and effectiveness of the light. Regular inspections provide an opportunity to detect any nonessential problems. They allow us to overcome these problems at the initial stages. This prevents the problems from turning into significant failures.
Fixture Replacement and CCT Monitoring
Even high-quality LEDs are slightly affected by color change. They are also affected by other changes through the course of time, which is called aging. This aging should be monitored with a maintenance plan. The plan should include timely replacement or adjustments. This ensures the design remains consistent as it was originally.
Seasonal or Contextual Adjustments
Depending on the varying conditions, the lighting can be changed. As an example, the intensity of lights could be varied depending on the length of daylight during the year. The aiming angles could also be varied depending on the length of daylight during the year.
5 Common Facade Lighting Mistakes and How to Fix Them
Before you start installing anything, it’s worth knowing the mistakes that show up in almost every poorly designed façade lighting project. Most of them are easy to avoid once you’re aware of them. A few mistakes when using facade lighting that every user must avoid:
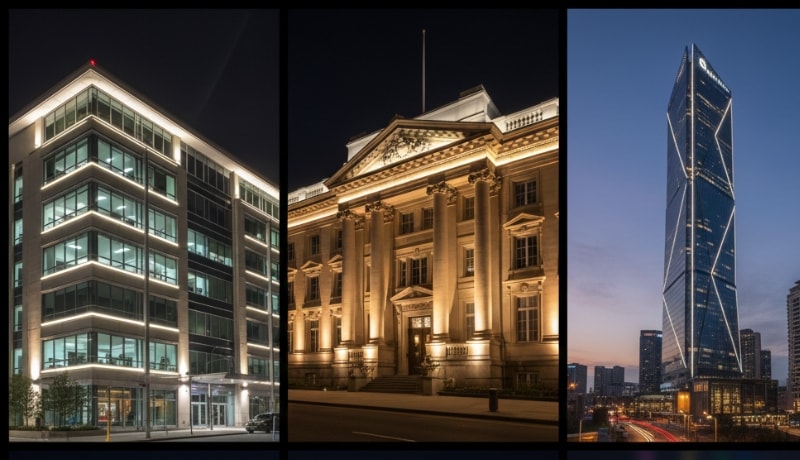
Improper Color Temperature of Heritage Buildings
Stone and brick appear tough and unnatural when using a cool white of 6500K. Use warm white 2700-3000K instead to keep the right material texture and to enrich the natural character of the building.
Wall Washers Fixed Inappropriately
Wall washers mounted too closely cause hotspots and disproportionate brightness. Apply the 1/3rd rule; the fixtures should be mounted at one-third the wall height, and asymmetric optics should be used to achieve smooth vertical coverage.
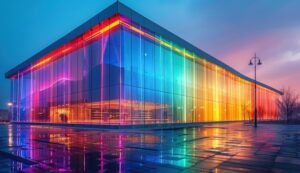
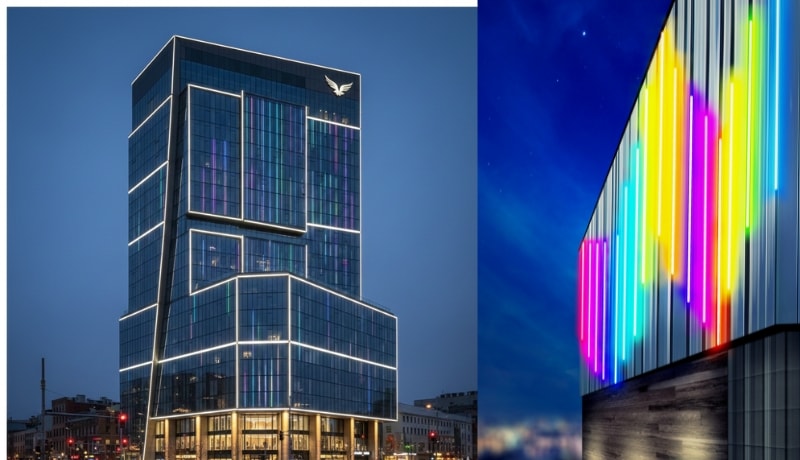
Overusing RGB Color Effects
Constant color cycling appears amateurish on business or institutional structures. Use white light as the main option, and use RGB on special occasions with slow and minor transitions.
Installation of Low-IP Fixtures outdoors
Outside, indoor-rated fixtures do not last long. Always state IP65-IP67 to ensure constant protection against snow, dust, and corrosion.
Overlooking Glare and Light Spill
Uncontrolled light spills are annoying to neighbors and do not comply with codes. Shields, louvers, and accuracy in aiming should be used to ensure that light is varied to the facade only.
Conclusion
An effective workflow of facade lighting design is a disciplined, five-step process. This is an effective way of ensuring that each and every part, such as the selection of the CCT and the final lighting of the LED facade, leads to a sustainable and effective solution.
A well-designed façade lighting project isn’t just about choosing bright fixtures. It’s about planning the entire journey from concept to installation. When you follow a clear workflow, you avoid common mistakes, save money, and make sure the final result looks exactly the way you imagined.
The most effective way to be sure that you have the greatest visual impact is to plan your lighting at the first stages of an architectural work.
Ready to make your building an amazing nighttime beauty?
Use RC Lighting in your next project. Our experience in innovative, high-efficiency LED facade solutions assures that your architectural vision is provided in a warm, impeccable manner, on time, on budget, and constructed to be durable.
To design the night, book an appointment with an RC Lighting specialist today to plan out a project and get started.
FAQs
Q1: What is the recommended number of lux in facade lighting?
Generally 50-150 lux, depending on the building material, height, and intended emphasis.
Q2: What distance should wall washers be mounted from the wall?
Apply the 1/3 rule: one-third of the wall height is the distance to the even illumination.
Q3: What is the CCT that is needed in a hotel, a mall, or an office building?
Hotels: 2700-3000K, Malls: 3000-3500K, Offices: 3500-4000K.
Q4: How to avoid light pollution?
Use specialized optics (like asymmetric beams) to ensure light is directed only onto the building surface. Adding shields or snoots to your floodlights also significantly reduces skyglow.
Q5: DMX or DALI, in the battle of controlling systems, which one wins?
DMX to do dynamic color effects; DALI for building integration and white light dimming accurately.